Star Wars D6: Green Vipers Episode V (Part I)

Episode V - Assault on Repair Station M13 (Part I)

Introduction:

The Long Shot campaign continues with this adventure outlined in the Classic Adventures book. All of my additions to the outline will feature on this blog at a later date. This adventure took 4 sessions to run and this post covers events from the first 2 sessions. As usual, I own none of the images which were mostly sourced from google. Please note that this is an advert free, not for profit blog. 
Additionally, please visit The Rancor Pit. The support shown to me by fellow GMs and players there has been wonderful - thanks again to all of you who are reading these write ups! 

Briefing:

Music Cue: Rebel Briefing

Nowhere

As usual, the team convene in the Command Centre on Nowhere where Lens and Mikka Reekene await with their advisor Santhou. Also in attendance are Captain Ixsthmus and Sienne Symm, as well as General Reekeene’s droid C4-S0 and a pilot most of the team don’t recognise.


Mikka Reekene: Thank you for retrieving the supplies, and our droid, C4-S0. It seems that the pirate, Vangar, is running a major operation in our sector. The supplies they stole from us were headed for Wessiri Palace on Caamas - in the Core Worlds. It suggests that Vangar’s operation is part of a larger criminal organisation. We believe that the Imperials may be turning a blind eye to Vangar's operations because they know his business is interfering with ours. Vangar is a concern for another time, however.


Mikka Reekeene


Lens Reekeene: That's right. First on our agenda is that your team will be receiving some replacements for fallen comrades. Tarrik’s old droid R3-FU has already been repaired and returned to you. To add to that, my droid C4-S0 will be joining you, as will a former member of Jaden Jericho’s crew, Corr Alden. 


Lens Reekeene


C4-S0: Oh my! These Vipers are a terrible bunch of rogues! Did I do something to displease you, General?


Lens: Uh...No, not at all C4! I just think your, err, expertise could be better utilised with this crew!


JiBa: Ah, Corr! It is an honour to have you on board!


Corr: Hey, how are you my old friend? So you're Captain JiBa now, eh?


Corr Alden


JiBa: Aw yeah, about time they put me in charge! And first rule is no blasters! The sword is the weapon of a true warrior!


JiBa


Kira: I don't think so JiBa! I'm keeping mine!


After some further arguing, the rest of the team refuse to give up their blasters, much to JiBa's disgust. Sensing their General's displeasure, he relents and allows Lens to continue with the briefing.


Lens: You will no longer be assigned to The Long Shot-


Captain Ixsthmus: What a relief! These Vipers have been nothing but trouble, and with that maniac JiBa in charge, they'll be a calamity!


Captain Ixsthmus


Lens: Thank you Captain, your comments are noted. You are dismissed!


Captain Ixsthmus grunts and Siene Symm wishes the Vipers well before they leave.


Lens: As you’re off the Long Shot, you’ll need a new ship. Jaden Jerichos’ vessel, the Centurion is available for your use. It seems a good fit since both JiBa and Corr are familiar with it. You may treat it as your own and feel free to make any modifications you wish in your own time between missions. I trust this is to your satisfaction?


JiBa: Uh, yeah, but I want to rename the ship! Can I do that?


Lens: Like I said, it's yours.


JiBa: Right! From now on it's called the Yindao.


Lens: Fine. If that's settled then...? Thanks to my overly loquacious droid, C4-S0, you may already be aware of Operation Retribution which is due to take place in nine days' time. The plan is to hit a spread of Imperial operations across the sector. Once the operation is underway, we expect the Empire to divert their resources to respond to our attacks. Though your skills in diplomacy are questionable, your aptitude for destruction is not. That’s why I’m assigning you to a mission on Mycroft. Santhou will explain the details…


Santhou: Thank you General. In orbit around Mycroft is a space station which will be targeted by Bronze squadron; but on the surface of the planet there is a refuelling depot. Our intelligence suggests that the outpost is staffed by approximately fifty workers. However, we expect that most of these are civilians who are neither trained soldiers, nor likely to wish to become embroiled in any firefight. Beneath the outpost, a small hangar bay is built into the side of the cliff where space craft can be refuelled. Intelligence indicates that it houses three TIE fighters which we expect to be scrambled to respond to our attack on the space station. If at all possible, we want you to disable those TIEs before they have the chance to launch, but it is not mission priority; our boys should be able to handle such puny opposition. Keep in mind that if an alert is raised before our attack, significant air support could be deployed from the space station to end your incursion - and could be damaging to ours as the Empire will call for reinforcements. I do not need to stress how deadly strafing TIE fire may be should you be caught out in the open. Once the Bronze squadron’s attack is underway, the Empire won't be able to send reinforcements to the planet and the refuelling station for a further three days…


Santhou


Lens: ...Giving you Green Vipers plenty of time to complete your mission. We want you to harass the outpost, capture prisoners for interrogation, steal supplies and weapons, and, if possible, destroy the entire outpost. Hit hard, maximise damage at minimum risk, and make sure you get out of there after two days. JiBa - try to bring everyone home alive! May the force be with you.


The briefing over, the team report to the store master Captain Hark'r who, as usual, begs them to get him off of Nowhere. JiBa tells Hark'r if he can get him four thermal detonators, he will help the Noehon Merchant. Hark'r only has two, but promises to try to get them for JiBa next time he is back on base.


The Vipers troop on to the Yindao, their new home now that they are no longer on the Long Shot. Corr is appalled that the ship he grew up on has been tampered with by Rebel engineers, but takes his place in the cockpit and blasts off. 


The Yindao


Deadline on Mycroft:


Midway through their journey the hyperdrive malfunctions and the Yindao crashes out of hyperspace. R3-FU and C4-S0 investigate and discover that their new pilot made a mess of the astrogation calculations. FU rights the error and the ship continues with its journey, arriving at Mycroft a day and a half before Operation Retribution is due to begin (but half a day later than scheduled). Corr carries out a sensors sweep and picks up the space station that Bronze Squadron are due to attack. He also locates the outpost and a small nearby town and takes the ship down to Mycroft.


Music Cue: The Princess Appears

Landing on an open clearing next to the town, the Vipers talk to the Sheriff who explains that they need some new power generators. It becomes apparent that although most of the townsfolk work on the Repair Station, the Empire does not particularly care for their living conditions. The team make their way to the local cantina just as a large ground transport - locally referred to as "the bus" - drives down from the outpost to drop off workers at the end of their shift.


Corr talks to one of the locals about how the Empire have behaved badly towards the town in not properly treating their workers, but the man seems distressed by the stranger's open condemnations of the Empire's evil deeds - and quickly leaves the bar. Two Stormtroopers enter shortly after and arrest Corr. As they exit, the Vipers attack the Stormtroopers, seriously injuring both in the process. They drag the Stormtroopers on to the transport bus. Kaleban tries unsuccessfully to save the life of one Stormtrooper who is close to death - but does succeed in reviving the other. JiBa intimidates the trooper to provide them with information on the outpost and to supply them with passes and clearance codes. 


Kaleban


Kira and JiBa put on the Stormtrooper uniforms and the surviving trooper is tied up on the Yindao. Corr, Skye and both droids decide to stay on the ship while JiBa, Kaleban and Kira infiltrate the base. The following morning - 24 hours before the assault - the team pick up the workers and drive them up the mountain to the outpost. Their story works successfully - but they discover the 25 workers who have just finished their shift have to be taken back to the town! They drive them down before concocting a story to return to the repair station, stating that the transport needs maintenance. 18 hours before the Rebel assault, they return to the outpost... 


Bus Transport

Music Cue: Inner City
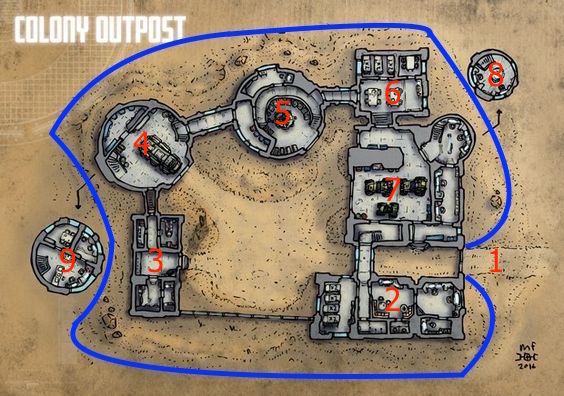
...and park the vehicle in the garage (4). Technicians emerge from the Tool Shops (3) and ask what the problem is. Kira thinks on her feet and tells the technicians to check the starter motor. They start chatting amongst themselves until JiBa emerges from the vehicle with a sword, threatening to kill them if they don't climb into the back of the vehicle. Kaleban warns the terrified workers not to do anything stupid, but seems convinced that the workers won't act against them - these guys are only here for a paycheque after all. Kaleban takes the overalls from one of the mechanics and emerges from the vehicle with Kira and JiBa disguised in Stormtrooper armour. Inside the garage, there are stairs leading up and down. The trio opt to head upwards as one of the bases' two Turbolasers is housed in the tower above them (the other in in the hangar on the side of the cliff below).


Map with key


Map with Personnel Starting Positions


A Stormtrooper is in the tower (omitted from the above starting positions map accidentally). The gunner demands to know why JiBa is here as he was not expecting to be relieved from duty. JiBa draws his sword and runs it through the man! He orders Kaleban to take control of the turbolaser while he and Kira return to the bus. They drive it across the courtyard to the Vehicle Pool (7). As a Stormtrooper approaches the bus, JiBa tells Corr to fire up the Yindao's engines and get ready to attack the base! 


The Attack:


Music Cue: Rescue of the Princess

As the Yindao swoops across the base, the alarm sounds and suddenly the whole base comes to life! While the Stormtrooper is distracted by the sudden alert, JiBa leaps from the cabin and slashes with his sword. A close range blaster shot from Kira finishes off the guard and she rushes forward as the shutters open on the Vehicle Pool! She guns down another Stormtrooper, but one has got into a speeder and opens fire with the repeating blaster! The volley misses Kira by a fraction as she takes cover behind the wall! JiBa mounts the speeder and runs his sword through the Stormtrooper - while Kira shoots down another arriving in the Vehicle Pool! As she takes control of another speeder, she drives out into the compound, as it fills with technicians fleeing the Command Centre (5). She tells them to take cover inside the bus - an invitation they gratefully accept! Unfortunately, in the chaos and confusion, Kira fails to notice that the base's commander has snuck into the technicians' midst and is ready to make his escape!

On board the Yindao, C4-S0 and R3-FU angle the deflector shields and pick up an emergency transmission emitting from the Command Tower! C4 interprets the message!


C4-S0: Oh no! They've sounded the alert and TIE fighters are scrambling from the base - and there's twelve, not three as intelligence suggested! And to make matters worse, another eight are being sent from the space station in orbit! I told you no good would come from putting that blithering idiot JiBa in charge! We're doomed!


Corr: Make yourself useful! Get into the other gunnery and help Skye against those TIEs!


C4-S0: I'm afraid that's against my programming, it wouldn't be proper!


Corr: Proper?


C4-S0: Yes! I'm programmed for etiquette, not destruction!


C4-S0


Back on the outpost, two Stormtroopers (guards from the entrance 1) pursue JiBa through the Conference Rooms (6) and then into the Command Centre (5). Confused by his Stormtrooper disguise, the only guard in the evacuated Command Centre is maimed by JiBa. With the other two Stormtroopers bearing down on him fast, JiBa throws one of his fragmentation grenades, finishing off the one he'd run his sword through - and wounding the others!


Three TIEs emerge from the Hangar Bay below and Skye blasts at them from the Yindao - backed up by Kaleban from the Turbolaser Battery. The TIEs are so fast that they evade much of their fire - but Corr is no slouch in the Yindao's cockpit, sending the YT-1300 into a series of spins that causes C4-S0 to wail uncontrollably!


Skye


Kira drives the speeder back into the garage (4) and, leaping out of the vehicle, heads downstairs...


Map with Key


Map with Personnel Starting Positions


...as she bursts through the door (11) still in disguise, she emerges into the base canteen (15) where there are several workers and Stormtroopers!


Kira: What are you doing down here? The base is under attack! Quick, get up there - and you workers, get out of here in the bus!


Kira


Kira's deception works perfectly as the staff rush upstairs - but, hearing that Kira has sent more enemies his way, JiBa curses her! Kira rushes down the corridor and hears shouts...she passes crew quarters (16) and spots the hangar bay (19). There she sees pilots rushing to their ships. The first six have already flown outside, but the second rack of six has been deployed from a recess in the wall. If she doesn't stop some of them, it could spell doom for their friends in the Yindao...


To be continued...


Star Wars D6 Adventure: The Heat Of Freedom

Star Wars: The Heat Of Freedom


Introduction: This adventure is intended for the Star Wars D6 RPG system and expands upon the outline provided in the Long Shot Campaign adventure of the same name - which can be found in West End Games' Classic Campaigns supplement. A copy of this supplement and Star Wars REUP rules, the latter of which is *available here* is assumed before play begins.

Please note that I do not own the images contained in this adventure, they were all sourced from Google images, although I have altered some of them to provide information. This is a not for profit, advert free blog.

Special thanks to members of the Rancor Pit for providing me with stats for the Maintenance and Control Droids, apologies for liberties taken in altering with a few of the stats!


Expanded information on the adventure outlined in the Classic Campaigns supplement. Note that it assumes the players have already completed the first mission Tests of the Godking.


Alabash, where most of the mission takes place


Visit to Nowhere: 


Note: Nowhere is the same ship referred to as Home in the original material. 


The team are told to report to Lens Reekeene to provide a debriefing of their time on Masterhome - she will be joined by her husband and her advisor Santhou. Captain Ixsthmus will report any of the team's transgressions during the mission to Lens, such as if the team went against orders and threatened the Anointed Ones from that mission. It assumed that they recovered Moff Dixton has been interrogated or the players recovered his data-tapes. 


Lens will be scathing about their behaviour and will be dismissive of any request to find the Saviour Sword from the pirate named Vangar on Pilahni. She demands that smuggler Jaden Jericho be reassigned to pilot a transport full of supplies while she sends the others on a different mission.


Lens Reekeene: As a result of your mission to Masterhome, and your encounter with Fakir Sector’s next Governor General, Moff Dixton, we've gleaned some important information. Santhou, if you would explain…


General Lens Reekeene


Santhou: Thank you General Reekeene. The tapes indicated that the Imperial Resource Procurement Bureau (ReProBu) have set up an automated mining operation on the world of Alabash on the far edge of our sector. A young world, we believed the world’s extremely volatile volcanic system - which covers most of the planet’s surface - would have made such an operation too hazardous and expensive to contemplate, yet the Empire has found a way. They are now pulling in 600 tonnes of high-grade alantium a month from the station on the planet, a significant boost to the Empire’s ship-building operations elsewhere in the galaxy. We want this operation shut down - permanently. Captain Hark’r will provide you with ReProBu passes and passwords obtained from the datatapes - as well as weapons and other supplies… Any questions?


Santhou


Even if they do have questions, Santo can repeat what he has told them but can’t tell them any more. Allow the team to visit Captain Hark'r and receive the equipment as set out in the "Outfitting" section in the Classic Adventures supplement. The thermal detonators they are provided will be key to succeeding in this mission, especially as there are some incredibly tough droid enemies! From there, the team will report to the Long Shot and pick their positions on the ship.


Given the information already provided, the following title scroll isn't necessary, but I find it helps get the players in the mood as the adventure gets underway proper!


A Needle in a Molten Ocean:


As per what has been written - add an encounter with Aeractyl which attacks the ship. Stats are the same as for a Varactyl on page 329 on REUP - except that it can fly (it has two large flaps of skin between its front and hind legs and floats upon the rising hot air from the lava pits below). It mistakes the ship for prey and will try to land on it and before tearing at the metal plating on the hull. The players must dislodge it from the ship before it does too much damage. Ixsthmus will be extremely distressed by the attack.

The Aeractyl is the airborne cousin of the Varactyl pictured above


Abandon All Hope:


The mining complex is a huge 500 metre x 500 metre slab of technology which floats 20 metres above the ground, sucking up a 100 metre wide swathe of land, extracting the valuable elements and spewing out a huge gout of fine pulverised dust in its wake. Huge repulsorlifts keep the platform aloft and heat shielding protects the platform from the scorching heat of the volcanic surface. 


Run the adventure as set out. The main thing that's missing is that no map and little detail has been provided about the facility. Hopefully, what follows will help you but feel free to expand upon anything else! 


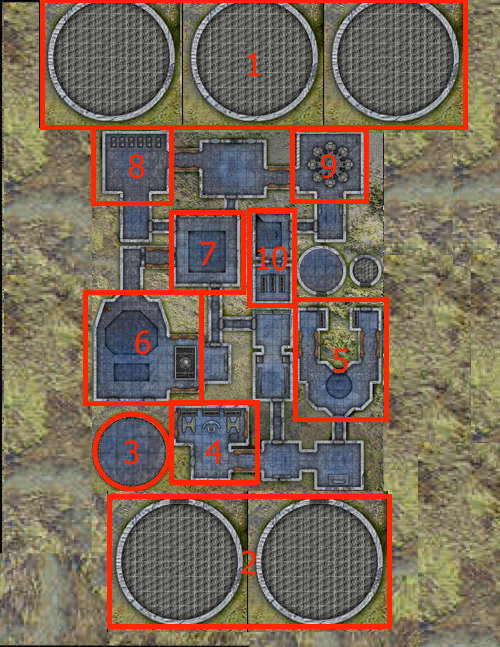
Facility Overview Map with Intake and Refuse Devices


Facility Overview Map with Intake and Refuse Devices: GM Copy with Key


Key:


  1. Intake Suction Devices
  2. Refuse Disposal Sprayers
  3. Landing Pad
  4. Reception area/Sensors
  5. Repulsorlift Engines
  6. Elemental Separators
  7. Storage
  8. Droid Repair Centre
  9. Control Area
  10. Shields and Weapons Systems


As outlined, the PCs land on the Landing Pad set out on the map. Details follow about the sections on the map.


  1. Intake Suction Device: this is beneath the platform but there are grills above ground. Should any PC attempt to enter the area, they will find themselves in a storm of hot earth - damage will be 8D, no dodge possible. Throwing thermal detonators into the intake does nothing; the device is designed to tolerate scooping up molten lava. The tunnel leads through to the Elemental Separators. 
  2. Refuse Disposal Sprayer: sprays the fine dust out behind the platform, inflicting 3D damage on anyone who attempts to enter the sprayer. Stamina rolls with an increasing difficulty of 5 per round will be required to crawl through the space for anyone without breathing apparatus. The tunnel leads through to the Elemental Separators.
  3. Landing Pad: Descends when the ship lands, and huge blast doors over, preventing escape.
  4. Reception Area/Sensors: Staffed by 6 CZ-Series Reception Droids, (page 376 REUP for stats). They will not cause any trouble. Once the team blow the doors to force their way forward, 2 Droidekas, (page 377 of REUP), are positioned just beyond the room and will engage the team if they attempt to proceed. Assuming they eliminate the Droidekas, the control computer activates vermin control which consists of 30 Battle Droids and 2 Super Battle Droids, (page 377) of REUP which act as overseers. They are split into 2 groups of 15 Battle Droids with a Super Battle Droid leader each. 1 squad is based at the Droid Repair Centre, while the other starts in Storage. Move the teams to intercept the team as desired. 
  5. Repulsorlift Engines: There is a huge maintenance droid in here which will attack if they enter. If the engines are shut down, the whole platform falls from the air and starts to sink in the molten ground - start a clock. The team have 1 hour real time to escape the facility before lava starts filling up in the Elemental Separators and spreading from there.
  6. Elemental Separators: This room is a cyclone of flying debris where the material is separated to be siphoned off to storage or to the Refuse Disposal Sprayer. Simply entering this room will inflict 8D Damage (3D damage just for opening the door) - if they can somehow fool droids into entering this room, they will trash the lot!
  7. Storage: The valuable resources are received here via a conveyor belt which links this room to the Elemental Separators, dropping into a huge pit beneath where storage lies, a massive silo which is the size of the upper floor. A huge number of labour droids (50) move the material around the silo but cannot get to the upper level unless the grabbing device is used to lift them out. There is nothing to be gained by going down - the labour droids will try to bludgeon anyone who does.
  8. Droid Repair Centre: There is little of interest here except for a player looking for droid parts - they can find anything they are looking for but not anything to carry them with. A player can only carry one droid part per free hand. Backpacks can carry three parts. An EV Supervisor Droid will resist any attempt to take parts along with any vermin control droids still here.
  9. Control Area: The Control Droid is a huge machine with large tentacles that will try to crush the team. If a thermal detonator is thrown at it, it will drop down a hole in the room to a platform below which overhangs rivers of lava. There are two such platforms which run parallel to each other. The droid will use its limbs to climb under the platforms and leap between them, making it incredibly difficult to destroy. Also, if it is not pursued, the droid will return to the Control Area: it has sensors and cameras all over the room which must be destroyed to make it ‘blind’ to the PCs’ endeavours here. 
  10. Shields and Weapons Systems: This gives the PCs control over a number of the platform's central systems. A Moderate Computer Programming roll is required to access the system. They can open or close doors across the station, including the doors which keep the Long Shot trapped. Deactivating the shields means the underside of the station will be slowly cooked. It can stand up to 2 hours of shields being deactivated until the repulsorlifts are cooked and the platform crashes as per 5 above. Guidance systems will allow the PCs to guide the platform's direction and can potentially guide it into a volcano! The weapons systems allow the PCs to launch missiles. Cornered in this dead end, my PCs used the missiles to blow a hole between this room and the one beneath it, giving them an escape route!

If the PCs do not dispatch the Control Droid but manage to sabotage the station, it will be hellbent on destroying the Long Shot - it launches a series of missiles on nearby volcanoes to induce massive eruptions, before running across the upper exterior of the facility to the landing platform. When the Long Shot emerges, it will be up to the PCs to try to shoot it off or find some other ingenious way to dislodge it (activating hyperspace being an example).

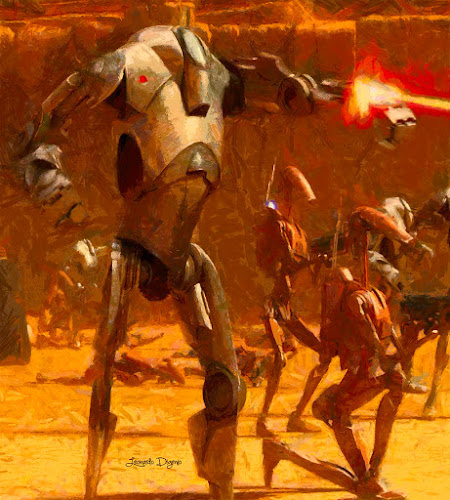
Super Battle Droid flanked by Battle Droids


Maintenance Droid

Control Droid


Platforms beneath the chute in the Control Area


Escape from the Facility:
As they take off, at least one volcano detonates (two if the control droid fired missiles) and the PCs must evade incoming volcanic rocks to fly to safety. If you want to up the difficulty, have up to 3 Vulture Class Droid Starfighters pursue the ship before hyperspace can be initiated.


Droid Notes and Stats:

Both Droids can be hacked with Droid Programming, Moderate for the Maintenance Droid, Very Difficult for the Control Droid.


Maintenance Droid:

Dexterity 3D

Knowledge 1D

Mechanical 1D

Perception 1D: Search 2D

Strength 8D

Technical 1D

Equipped with: 2 hydrological legs, 2 heavy manipulator arms, layered durasteel plating (+2D physical, +1 energy), Industrial grade plasma torch (7D damage, left palm), Laser cutter (5D damage, right palm), Shearing maw (STR+2D damage), internal fusion furnace, handheld remote commander.

Move: 6

Size: 6 meters tall


Control Droid:

Dexterity 4D

Knowledge 1D

Mechanical 1D

Perception 4D

Strength 8D

Technical 1D

Equipped with: 8 hydrological legs with pincers (STR +1D) layered durasteel plating (+2D physical, +1 energy).

Note: The Control Droid can be blinded but can continue to "see" through other cameras on the base. -1D to all actions when using cameras to attack, otherwise -2D to all actions.

Move: 6

Size: 6 meters tall


To learn how my players got on, the write up is available here!


Thanks for reading!


Star Wars D6: Green Vipers Episode IV

Episode IV - The Pirates of Pilahni

Introduction:

The Long Shot campaign continues with the published adventure "The Pirates of Prexiar" which features in the excellent Star Wars D6 REUP rulebook which you can find here by clicking on this text. This adventure took 2 sessions to run. As usual, I own none of the images which were mostly sourced from google, and thieved from the REUP book. Please note that this is an advert free, not for profit blog. 
Additionally, please visit The Rancor Pit. The support shown to me by fellow GMs and players there has been wonderful - thanks again to all of you who are reading these write ups! 

The Pirate Camp:


Jungle on Pilahni

Music Cue: Mouse Robot and Blasting Off
Not knowing what the data cache looks like, the Vipers decide to worry about that later, and simply focus on getting to the supply crates. The first hurdle they encounter is crawling under the shock fence by the stream. All goes well until the last Rebel - Skye Bodelyn - clips the fence. The electrical shock is amplified by the stream she is crawling through and she is knocked unconscious! Jimi pulls her free and Kira cracks open a medkit to revive her friend. The team push on past the kitchens and then head for the tool shop.

Note the PCs in the red box on the bottom left hand corner

Time is running out before dawn and they hug the shadows as best as they can, but as they make a break for clear grounds, Jimi looses his footing on some loose stones, and not seeing him in the dusk light, Skye trips over him! Nearby guards approach to investigate. Kira and JiBa make it behind the landing struts, while mercenary Kaleban lies down and eyes the pirates approach through his rifle sight. The spooked guards fire a blind shot into the dark. Although Jimi and Skye regain their footing, the sound of them rushing across the open ground draws in the guards further - with further guards rushing from the rear of the corvette!


Music Cue: Return of the Jedi
As the guards unwittingly approach them, JiBa and Kira spring from the shadows and stab repeatedly at the pirate sentries, killing both after a brief scuffle! Kira checks the pirate communicators and realises that they've been detected! With the sun now rising and reinforcements on the way, they need to move fast! JiBa climbs the landing gear and impressively uses the fine gaps in the ship's hull plating to climb the overhang and get on top of the ship! 
JiBa

JiBa provides a distraction from above the corvette, drawing the guards below towards him, providing Kira and Kaleban the opportunity to catch the guards in a crossfire, killing both! Jimi and Skye get bogged down in a firefight with the two guards guarding the cargo, but eventually both are incapacitated and the way is cleared for them!


JiBa leaps from the corvette on to the skiff which Kira takes control of. The rest approach the crates while more pirates - guards from nearby warehouses - close in on them!


Jimi hears shouting coming from his crate. His gun at the ready, he flips the crate open - and a protocol droid springs out! 

C4-S0: Thank the maker! Master Lens Reekeene must have sent you to save me!

Jimi: I'm not so sure about that!

C4-S0: Oh dear! Please help me escape this awful place!

C4-S0

Skye discovers a light repeating blaster in the crates and, aided by Kaleban and Jimi, opens fire upon the pirates! Kira revs up the skiff and launches it through those not cut down by the withering Rebel fire! The team load up the skiff with the cargo crates and hop on board. C4 waves his hands despairingly!

C4-S0: Wait for meeeeeee!

Jimi hauls the protocol droid on board as Kaleban takes over the skiff's controls and guns it for the entrance! Kira deploys the repeating blaster on the tripod at the rear of the skiff and blasts a guard from one of the towers! He falls upon the shock fence, electrocuted in his last moments! Seeing ten pirates ahead of him, Kaleban floors the accelerator and mows down the entire mob - but is shot from the tower! 


With Kaleban collapsing, Skye desperately grabs the controls and just manages to slow the skiff enough to spin it around, the rear smashing a tower down! The scaffolding crashing around them, a guard crashes on to the deck. JiBa is quick to react, instantly driving his sword through the prone pirate! Skye brings the skiff around and drives it out into the jungle...

Skye Bodelyn
Jungle Chase:
Music Cue: Duel of the Fates
Before long though, the Vipers hear the sound of speeder bikes! Six pirates quickly make up ground on the slow-moving skiff and trade blaster shots with the Vipers! C4-S0 barks suggestions to aid Skye in her piloting the skiff, but if the robot's demands to pull on different levers annoy her, she doesn't let it affect her. JiBa screams insults at the riders, daring them to pull up alongside so he can spear them with his sword, while Jimi and Kaleban take potshots at the bikers. Jimi's shots go astray but Kaleban blasts a biker from his mount! Kira looses several volleys from the repeating blaster - to deadly effect, taking down another two bikers and wounding another! 

Kira Rishkar
Music Cue: General Grevious
The bikers break off the pursuit as the skiff heads through a clearing...no one spots two AT-PT walkers waiting at the far end of the clearing to ambush the skiff! 

Pirates and AT-PT Walkers


Heavy fire from the walkers broadside the skiff - knocking C4-S0 from the skiff - and, smoke billowing from one side, it comes to a standstill. Kaleban leaps from the skiff and rushes off to one side, taking potshots at one walker to draw its fire from the skiff. The walkers advance, but, somewhat fortuitously miss both Kaleban and the skiff! Jimi realises that if they switch a power coupling over, they can bring the skiff back online. Skye snatches the cables from him, and the engines roar to life. Kira's repeating blaster strikes a power regulator on one of the walkers, and it is disabled! Meanwhile, JiBa refuses to lift the 'dumb droid' back on the skiff, only relenting when Kaleban moves to do so! With both back on board, Skye guns the skiff forward at break-neck speed and away from the last walker!

Kaleban Maars

The Pirate Corvette
Music Cue: The Forest Battle
As they Vipers finally return to the Long Shot, they see the pirate corvette circling in the sky, searching the jungle for them - but 10 pirates have been dropped off and are planting detonite charges on the ship! Skye brings the skiff in close to the ship and Jimi tells Captain Ixthmus to take off to shake the boarding party loose. He starts firing up the engines - while a deadly firefight ensues between the Vipers and the pirates! With the whole team laying down heavy fire, the pirates are cut down one after another - but Jimi takes a blaster shot to the head. He recovers and incapacitates another with his stun weapon! But the last pirate standing returns another shot - and he is hit on the head a second time...killing him!

Jimi Ackbar

Music Cue: Into the Trap
Finishing off the last pirates, they take his body on board the Long Shot and make a hasty blast-off. Vangar's corvette follows them in quick pursuit, but a pinpoint shot from Kaleban on the turbolasers punches through the shields and hull to damage the generators! Vangar is forced to make a hasty landing while the Long Shot makes the jump to hyperspace.

C4-S0 reveals that he is the data package that Lens sent them to retrieve; the Rebel Transport he was on was sending supplies to Callonia to prepare for Operation Retribution.

On return to Nowhere, Lens Reekeene shares the Vipers' grief at the lost of Captain Jimi Ackbar. The team decide that they will bury him at sea when they are next on an appropriate planet to give him a proper send off. Lens also reveals that Tarrik Nightburner's old droid R3-FU has had its power restored and a brand new motivator installed. It will need a variety of other parts to be brought up to full functionality, but, despite being worried by Kaleban's amusement that the droid will prove a magnet for blaster fire, it is brought into the team. C4-S0 seems happy as he doesn't understand human behaviour - although when FU cheeks him, he slams its dome in anger! Lens promises that she will have another rebel assigned to their squad to replace Jimi. Lens points out that the team needs a new leader. JiBa leaps at the opportunity, and this time no one objects. He will be their captain with immediate effect! 

R3-FU

Battered and broken at the loss of Jimi, the Vipers wonder what role they will have to play in Operation Retribution....

To be continued... 


Closing Reflections

Another fun adventure! Skye once again used a force point when she gunned the skiff away from the AT-PT and recovered it. It was really sad that Jimi was killed outright - a difference of 16 is an automatic kill and gallingly that was the difference. Jimi's player took it well and agreed fair's fair as we said we'd stand by rolls and avoid fudging, even if it meant character death. I thought it was fun to make new player character C4-S0 be the actual data that the team were looking for - and Operation Retribution was brought into the game background as that is the next one in the Long Shot campaign. 

Watch out for another report soon!


Strontium Dog Miniatures Game - Mutant Army Generals

Mutant Army Generals Strontium Dog Mutant Generals Image (c) Warlord Games Along with the Kreelers, one of the last sets that was released f...