Expanded information on the adventure outlined in the Classic Campaigns supplement. Note that it assumes the players have already completed the first mission Tests of the Godking.
 |
| Alabash, where most of the mission takes place |
Visit to Nowhere:
Note: Nowhere is the same ship referred to as Home in the original material.
The team are told to report to Lens Reekeene to provide a debriefing of their time on Masterhome - she will be joined by her husband and her advisor Santhou. Captain Ixsthmus will report any of the team's transgressions during the mission to Lens, such as if the team went against orders and threatened the Anointed Ones from that mission. It assumed that they recovered Moff Dixton has been interrogated or the players recovered his data-tapes.
Lens will be scathing about their behaviour and will be dismissive of any request to find the Saviour Sword from the pirate named Vangar on Pilahni. She demands that smuggler Jaden Jericho be reassigned to pilot a transport full of supplies while she sends the others on a different mission.
Lens Reekeene: As a result of your mission to Masterhome, and your encounter with Fakir Sector’s next Governor General, Moff Dixton, we've gleaned some important information. Santhou, if you would explain…
 |
| General Lens Reekeene |
Santhou: Thank you General Reekeene. The tapes indicated that the Imperial Resource Procurement Bureau (ReProBu) have set up an automated mining operation on the world of Alabash on the far edge of our sector. A young world, we believed the world’s extremely volatile volcanic system - which covers most of the planet’s surface - would have made such an operation too hazardous and expensive to contemplate, yet the Empire has found a way. They are now pulling in 600 tonnes of high-grade alantium a month from the station on the planet, a significant boost to the Empire’s ship-building operations elsewhere in the galaxy. We want this operation shut down - permanently. Captain Hark’r will provide you with ReProBu passes and passwords obtained from the datatapes - as well as weapons and other supplies… Any questions?
 |
| Santhou |
Even if they do have questions, Santo can repeat what he has told them but can’t tell them any more. Allow the team to visit Captain Hark'r and receive the equipment as set out in the "Outfitting" section in the Classic Adventures supplement. The thermal detonators they are provided will be key to succeeding in this mission, especially as there are some incredibly tough droid enemies! From there, the team will report to the Long Shot and pick their positions on the ship.
Given the information already provided, the following title scroll isn't necessary, but I find it helps get the players in the mood as the adventure gets underway proper!
A Needle in a Molten Ocean:
As per what has been written - add an encounter with Aeractyl which attacks the ship. Stats are the same as for a Varactyl on page 329 on REUP - except that it can fly (it has two large flaps of skin between its front and hind legs and floats upon the rising hot air from the lava pits below). It mistakes the ship for prey and will try to land on it and before tearing at the metal plating on the hull. The players must dislodge it from the ship before it does too much damage. Ixsthmus will be extremely distressed by the attack.
 |
| The Aeractyl is the airborne cousin of the Varactyl pictured above |
Abandon All Hope:
The mining complex is a huge 500 metre x 500 metre slab of technology which floats 20 metres above the ground, sucking up a 100 metre wide swathe of land, extracting the valuable elements and spewing out a huge gout of fine pulverised dust in its wake. Huge repulsorlifts keep the platform aloft and heat shielding protects the platform from the scorching heat of the volcanic surface.
Run the adventure as set out. The main thing that's missing is that no map and little detail has been provided about the facility. Hopefully, what follows will help you but feel free to expand upon anything else!
 |
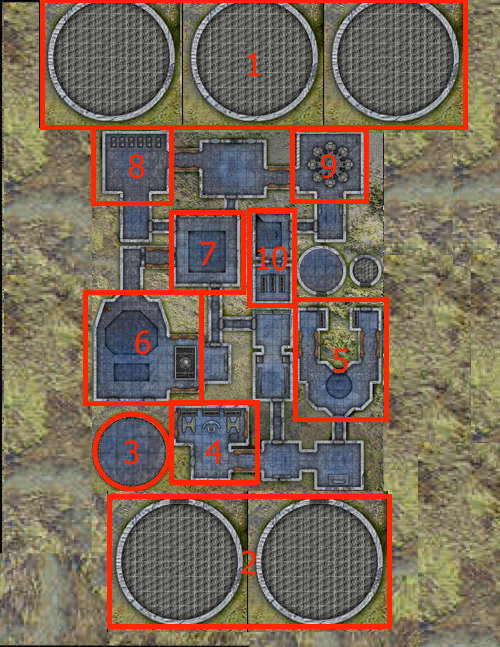
| Facility Overview Map with Intake and Refuse Devices |
 |
| Facility Overview Map with Intake and Refuse Devices: GM Copy with Key |
Key:
- Intake Suction Devices
- Refuse Disposal Sprayers
- Landing Pad
- Reception area/Sensors
- Repulsorlift Engines
- Elemental Separators
- Storage
- Droid Repair Centre
- Control Area
- Shields and Weapons Systems
As outlined, the PCs land on the Landing Pad set out on the map. Details follow about the sections on the map.
- Intake Suction Device: this is beneath the platform but there are grills above ground. Should any PC attempt to enter the area, they will find themselves in a storm of hot earth - damage will be 8D, no dodge possible. Throwing thermal detonators into the intake does nothing; the device is designed to tolerate scooping up molten lava. The tunnel leads through to the Elemental Separators.
- Refuse Disposal Sprayer: sprays the fine dust out behind the platform, inflicting 3D damage on anyone who attempts to enter the sprayer. Stamina rolls with an increasing difficulty of 5 per round will be required to crawl through the space for anyone without breathing apparatus. The tunnel leads through to the Elemental Separators.
- Landing Pad: Descends when the ship lands, and huge blast doors over, preventing escape.
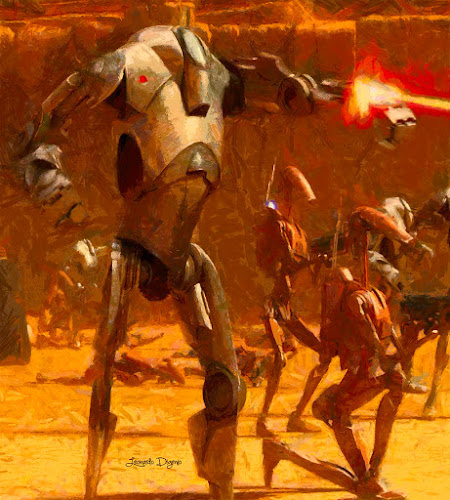
- Reception Area/Sensors: Staffed by 6 CZ-Series Reception Droids, (page 376 REUP for stats). They will not cause any trouble. Once the team blow the doors to force their way forward, 2 Droidekas, (page 377 of REUP), are positioned just beyond the room and will engage the team if they attempt to proceed. Assuming they eliminate the Droidekas, the control computer activates vermin control which consists of 30 Battle Droids and 2 Super Battle Droids, (page 377) of REUP which act as overseers. They are split into 2 groups of 15 Battle Droids with a Super Battle Droid leader each. 1 squad is based at the Droid Repair Centre, while the other starts in Storage. Move the teams to intercept the team as desired.
- Repulsorlift Engines: There is a huge maintenance droid in here which will attack if they enter. If the engines are shut down, the whole platform falls from the air and starts to sink in the molten ground - start a clock. The team have 1 hour real time to escape the facility before lava starts filling up in the Elemental Separators and spreading from there.
- Elemental Separators: This room is a cyclone of flying debris where the material is separated to be siphoned off to storage or to the Refuse Disposal Sprayer. Simply entering this room will inflict 8D Damage (3D damage just for opening the door) - if they can somehow fool droids into entering this room, they will trash the lot!
- Storage: The valuable resources are received here via a conveyor belt which links this room to the Elemental Separators, dropping into a huge pit beneath where storage lies, a massive silo which is the size of the upper floor. A huge number of labour droids (50) move the material around the silo but cannot get to the upper level unless the grabbing device is used to lift them out. There is nothing to be gained by going down - the labour droids will try to bludgeon anyone who does.
- Droid Repair Centre: There is little of interest here except for a player looking for droid parts - they can find anything they are looking for but not anything to carry them with. A player can only carry one droid part per free hand. Backpacks can carry three parts. An EV Supervisor Droid will resist any attempt to take parts along with any vermin control droids still here.
- Control Area: The Control Droid is a huge machine with large tentacles that will try to crush the team. If a thermal detonator is thrown at it, it will drop down a hole in the room to a platform below which overhangs rivers of lava. There are two such platforms which run parallel to each other. The droid will use its limbs to climb under the platforms and leap between them, making it incredibly difficult to destroy. Also, if it is not pursued, the droid will return to the Control Area: it has sensors and cameras all over the room which must be destroyed to make it ‘blind’ to the PCs’ endeavours here.
- Shields and Weapons Systems: This gives the PCs control over a number of the platform's central systems. A Moderate Computer Programming roll is required to access the system. They can open or close doors across the station, including the doors which keep the Long Shot trapped. Deactivating the shields means the underside of the station will be slowly cooked. It can stand up to 2 hours of shields being deactivated until the repulsorlifts are cooked and the platform crashes as per 5 above. Guidance systems will allow the PCs to guide the platform's direction and can potentially guide it into a volcano! The weapons systems allow the PCs to launch missiles. Cornered in this dead end, my PCs used the missiles to blow a hole between this room and the one beneath it, giving them an escape route!
 |
| Super Battle Droid flanked by Battle Droids |
 |
| Maintenance Droid |
 |
| Control Droid |
 |
| Platforms beneath the chute in the Control Area |
Escape from the Facility:
As they take off, at least one volcano detonates (two if the control droid fired missiles) and the PCs must evade incoming volcanic rocks to fly to safety. If you want to up the difficulty, have up to 3 Vulture Class Droid Starfighters pursue the ship before hyperspace can be initiated.
Droid Notes and Stats:
Both Droids can be hacked with Droid Programming, Moderate for the Maintenance Droid, Very Difficult for the Control Droid.
Maintenance Droid:
Dexterity 3D
Knowledge 1D
Mechanical 1D
Perception 1D: Search 2D
Strength 8D
Technical 1D
Equipped with: 2 hydrological legs, 2 heavy manipulator arms, layered durasteel plating (+2D physical, +1 energy), Industrial grade plasma torch (7D damage, left palm), Laser cutter (5D damage, right palm), Shearing maw (STR+2D damage), internal fusion furnace, handheld remote commander.
Move: 6
Size: 6 meters tall
Control Droid:
Dexterity 4D
Knowledge 1D
Mechanical 1D
Perception 4D
Strength 8D
Technical 1D
Equipped with: 8 hydrological legs with pincers (STR +1D) layered durasteel plating (+2D physical, +1 energy).
Note: The Control Droid can be blinded but can continue to "see" through other cameras on the base. -1D to all actions when using cameras to attack, otherwise -2D to all actions.
Move: 6
Size: 6 meters tall
To learn how my players got on, the write up is available here!
Thanks for reading!


No comments:
Post a Comment