Epic War - Midnight Campaign Part XVI: Assault On Ushgarak!


The entire war all comes down to this…Commander Dwalin is launching an assault upon the Ork base on the outskirts of Ushgarak!  Ork Kommander Krugger must see off the short-legged stunties to ensure that greenskins - not beards - rule the land of Midnight!

Both forces have 6,000 point armies in action. 55VPs are required for victory. The ruleset is Net Epic Evolution.

Here we see an overview of the battlefield.  The Squats are at the top of the picture while the Orks are at the bottom.  The Orks start the game with three sets of defences which consist of three sets of entrenchments.  They also have Initiative in Turn 1 and can deploy a further 15cm forward of the standard deployment zone.


Another overview of the battlefield.


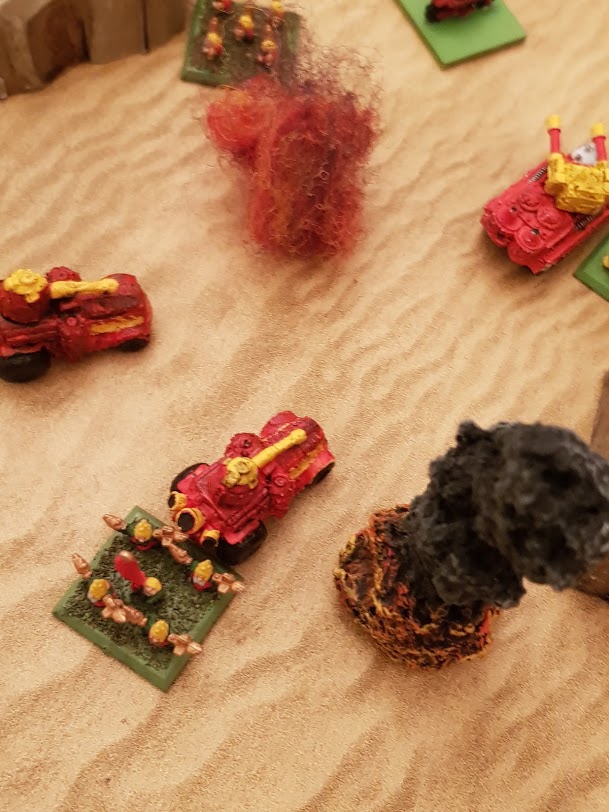
The satellite imaging shows the two armies facing up to each other.  In the centre of the Ork deployment zone is their base…


Supported by Squat Warriors, Commander Dwalin himself leads the battle!


In close attendance is a squadron of Iron Eagle Gyrocopters and, further along the line, a Land Train!


The Air Attack Corps and Grand Battery are positioned in the centre of the Squat army, looking on to the Ork base in the distance.


They are flanked by an awesome amount of firepower - more Gyrocopters, a Leviathan, a Colossus and two Cyclops Praetorians!


Having been disgraced twice in battle, Kili has also joined Dwalin’s ranks.  He has resigned as a Commander, now seeking revenge for his fallen brothers as Guildmaster in one of the two bike squadrons.  More Gyrocopters and two Goliath Mega-Cannon complete the Squat line up.


Krugger's Orks cannot match the sheer firepower that the Squats boast, but they do have defences, and more importantly, strength in numbers!  The beautiful green fungal lawns that Krugger commissioned here behind his entrenchments are among his most proud achievements... after murder and mayhem of course!  The green spores which rise from the fungi create a green snowy mist around the Ork base and seem to inspire an even more insane mania for destruction than is usual.  This is their home and no stunties are gonna take it from 'em!


Above the low green mist are entrenchments built into the hillside, behind which Lungbustas, Spleenrippas and Braincrushas have a clear view of the battlefield.


Also in attendance are Coptas which will be looking to pounce upon the Squat formations!


Hidden within the mound are Goff Boyz!  Their weapon range is too short to make a meaningful impact so they are held inside ready to pounce if the Squats breach their lines!


Finally, the Kult of Speed rev up their engines in excitement!  Behind them is the Slasha Gargant, ready to inflict hell upon the stunties!  The stage is set for an epic final showdown!


After a few early but largely inconsequential activations, the Bad Moons Clan launch an audacious assault upon a town deep in Squat territory…


…and they gun down a few Squat bikers!


But one of the two Cyclops Praetorians activates and uses the aptly named Hellfury Cannon to reduce one of the buildings to molten slag, killing a multitude of Bad Moon Boyz in the process!


Goliath Mega-Cannon roar on the far right of the Squat line and pick off two Braincrushas in the base!  Biker Nobz, two of whom can be seen on the far right of the picture, roar in and destroy the cannon as well as two Gyrocopters!


Spleenrippas, Lungbustas and the Braincrushas unleash a hail of fire upon the Cyclops, stripping it of its shields!


The Land Train rolls into the battle but does little to trouble the Orks!  Damn their entrenchment filth holes!


The Slasha activates and hits the Cyclops destroying its Hellfury Cannon!  The Colossus activates and retaliates!  The Slasha loses a few power fields but a few shots make it through the flickering defences - and destroy the boiler, starting a fire!


Commander Dwalin enters the fray and a building only to be burned alive by three Bowelburna scorchas!  His dying howls screeching loud in their ears, Dwalin's Warriors are pounced upon by a Warboss!  His battlewagons roar in and he thins their ranks with Lotsabigshootas!  Has the time of the Ork come?


Coptas jump Thudd Guns and in turn are engaged by Squat Bikers, led by Guildmaster Kili!


And predictably the Coptas are annihilated!


It’s not a traffic jam, it’s a full blown pile up!


Another success for the Squats!


The satellite view at the end of Turn 1.  The Orks have taken every objective on the board!


The Break Points are fairly even with the Orks picking up 7VPs and the Squats 6VPs.  The lack of shield regeneration on Praetorians, thanks to some awful rolls, causes concern for the Squats. 


End of Turn 1: 
Squats 6 
Orks 47


The Orks win initiative in Turn 2 and Nobz bikers cause havoc! They charge behind the stricken Cyclops and hit it with everything it has!  The reactor takes hit after hit before it suddenly explodes in a shower of molten plasma, taking a squadron of gyrocopters and breaking the entire Wing with it - and the Nobz bikers themselves!  As the plasma wave scorches the flesh from their bodies, the Orks roar in delight - their death woz legendary!


The sky lit up by the massive explosion of the Cyclops, the Squats in the Land Train target the Warboss and his entourage of Nobz bodyguards!


A rad bomb should do the trick!


And does! The green vermin are exterminated!  Boweburnas avenge the fallen by wiping out the remaining Warriors with a horrible death in liquid flame!  The high pitched wails of the burning beardies is sweet music to the Bowelburna crews!


On their next activation, the Squats activate the remaining Cyclops and the Hellfury Cannon, which targets the Slasha Gargant is unleashed! The awesome blast hammers the Slasha, (somewhat fortuitously) knocking down power field after power field until a final round punches through the ammo store!


A serious of explosions rock the Slasha and the Mekaniks are cooked inside the Gargant!  The fires get out of control and the whole Slasha explodes!  Nearby Evil Sunz Boyz do not see death approaching in the form of flame and shrapnel…


…which is small mercy because none survive the cataclysm!


The Air Attack Corps activate and inflict more punishment upon nearby Ork units…


…and a Skullhamma!


Spleenrippas and Lungbustas target the distant Land Train and destroy one of the battlercars!


Goff Nobz pour out from the defences late on in the turn but is there any need?


A mixture of units are engaged in close combat.  Twenty Berserkers make it their business to take down a Skullhamma and capture the objective at all costs!


Squad after squad of Berserkers die in the process but finally one squad emerges and captures the objective!


A similar battle ensues for a central objective but the Boarboy closest to the objective sees off his attackers!


A final combat ends the turn…


…and two Bowelburnas are destroyed!  The Berserkers in the nearby dome are close enough to another objective to steal it back!


At the end of the turn the Orks hold 6 objectives while the Squats only have 2.


The Orks have won 38VPs in death and destruction while the Squats took 35VPs.  


End of Turn 2: Squats 45 Orks 68 Victory to the Orks!


The remaining Squats are completely routed but what is the fate of the Land of Midnight?  See the final post next week!


All hail Kommander Krugger!  Thanks to him and the sheer battle lust he instilled in his Boyz, the victorious Orks have held on to Ushgarak base and the centre of Orkdom in Midnight!  Krugger should be proud of the determination of his Boyz to cause maximum carnage and destruction...but what leader wouldn't put those thoughts aside to simply savour the moment of adulation from an adoring army?


Strontium Dog Miniatures Game - Durham Red

Durham Red


Art by Carlos Ezquerra. Copyright Rebellion 2000AD Ltd 
One of the most feared Strontium Dogs (even among fellow S/D Agents), Durham Red's bizarre mutation gives her a vampiric appearance - and a few of those mythical creatures' traits! Out of all of Johnny's close circle of allies, Red is the only one he doesn't trust - and with good reason! Another fan favourite, Red is something of a rarity in the series, a central female character! Fortunately, Red is no damsel in distress; she knows what she wants and will do whatever it takes to get it! 

Stats

Red is an excellent all-rounder, moving as fast and reacting as quickly as Johnny! Handy with her dual guns. Criminal scum underestimating this lady do so at their peril! As with all of Johnny's close associates (except the Gronk), she brings an all-important star chip to the table.

Skills and Special Abilities

Bloodsucker: This is a fantastic thematic ability which, if it kicks in, sees Red draining the blood from a close combat victim to boost her Cool by 1 (non-cumulative)! This would raise her to a Cool of 5, Johnny being the only other character with Cool that high!

Gunfighter: Red knows how to handle guns and, if she is unpinned, she has the chance to use this ability to get the drop on any opponents firing upon her!

Vampire!: Getting too close to wounded characters limits some of Red's double actions including Aimed Shot. She's good enough with her guns for this not to be a huge issue; two snap shots usually work out as well as one aimed! 

Tactics for playing Red


Red's gun skill and Gunfighter ability are formidable so I personally would favour keeping her at range, behind some cover if possible. While she is likely to land attacks in close combat, it's worth remembering that she cannot inflict the level of damage that Wulf and Middenface are capable of; you should therefore expect close combat affairs to take an extra activation or two to put down opponents (assuming you engage them while they are at full strength). The big advantage in taking down an opponent in close combat is that there's a chance that the Bloodsucker ability will be activated, giving her that all-important Cool boost. Softening up opponents with gunplay and then going in for the kill to try to activate Bloodsucker is probably the best way to play her. Don't make Bloodsucker your main focus however, as activating it is far from a certainty. When playing her as part of a team featuring Johnny, Wulf and/or Middenface, I would generally activate her last. Those three other characters are more powerful if you play them to their respective strengths so it is best trying to deal out as much damage with them as possible and try to put their star chips back into the bag, activating them again and again. That of course, is situational and not a strict dogma you should adopt!

Overall

A great all-rounder, playing Red makes things easier for you as a player; you know she should do well no matter what situation she finds herself in! Just don't get suckered by Bloodsucker! Engaging tough, unwounded adversaries in close combat is unwise!

Optional Homebrew Rules (with special thanks to fellow SD superfan Leigh Shepherd for suggestions to these rules)

Fangs: For 2 Notoriety or an extra 20,000 bounty, Red's fangs add +1 to her Fight in close combat. Note that because of the extra cost, Red does not suffer the usual -1 penalty to shooting associated with fangs. 
Player note: The purchase of the fangs makes Red the ultimate all-rounder, as proficient in close combat as she is with weapons!

Creds over loyalty: Money is more important to Red than honour. At the end of the scenario, make a modified Cool test (based on current stats at the end of the scenario); if she passes by rolling a 2000AD result, she secretly pockets some of the money. Deduct 10% from all earnings (bounty less expenses) made on the job.

Double-crosser!: Sometimes greed gets the better of Red and she will employ seductive charm to double-cross allies and rob them blind. If you use this optional rule, both players must agree that Red will be played as follows:- you may field Red for a reduced 2 Notoriety/20,000 cred bounty. At the end of the scenario, make a modified Cool test for Red. If she passes the test by rolling a 2000AD result, she will hold her nerve and steal 50% of all earnings from the job! If she makes off with the money in a campaign, she is so convincing that none of the rest of the team even suspect! This means she will stick around and try to steal more, meaning more rolls in future encounters! Note also that if this option is selected for Red, it replaces Creds over loyalty; this ensures she cannot attempt to steal twice from the proceeds of one job.

However...
Red spikes Johnny's drink to make off with the job earnings...
Art by Carlos Ezquerra, copyright Rebellion 2000AD Ltd
Not so fast Red! Red's fellow combatants have a chance to see through her schemes; her allies in the scenario also make modified Cool tests (based on stats at the end of the battle). If any pass, they see through Red's scheme and her attempt to steal earnings fails. If they all fail, 50% of profits are lost as above. Note that if an ally passes the test and sees through Red's ruse in a campaign, she may not be fielded in the following scenario as she has bridges to build before he will work with her again! 

Note that if Johnny is part of the campaign team but was not played in the scenario, Not So Fast Red! cannot be used (Red alters the accounts to pocket the money before they rendezvous again). 

Player Notes: Taking Double-Crosser and getting Red for a reduced two Notoriety may be tempting but the chance that she will make off with the half of the earnings is potentially devastating! Losing earnings at the end of a scenario usually equates to losing the scenario! It is extremely bad news in a campaign too, potentially hammering funds multiple times over (although that would be a result of horrendous luck). Also, if someone catches her in the act, she cannot feature in the next scenario... High reward means big risk! Kudos to anyone who plays this for going full thematic!

...bur Johnny is no-one's fool!
Art by Carlos Ezquerra, copyright Rebellion 2000AD Ltd


Optional Homebrew "Bitch" Package: field Red for the standard cost of 13 Notoriety with Fangs, Double-Crosser! and Not So Fast Red! for the ultimate thematic Durham Red experience!  

The Strontium Dog Miniatures Game is available from Warlord Games.  If you want to get your teeth into it, click here!


Strontium Dog Miniatures Game - Mutant Army Generals

Mutant Army Generals Strontium Dog Mutant Generals Image (c) Warlord Games Along with the Kreelers, one of the last sets that was released f...