 |
| The "Bus" rolls into Repair Station M13 |
Expanded information on the adventure outlined in the Classic Campaigns supplement. Note that it assumes the players have already completed the first two missions in that supplement (Tests of the Godking and The Heat of Freedom). Note also that the TIEs mentioned in the Campaign Outline only fly out to respond to the attack on an orbiting Space Station - and not out of system as stated. This never worked for me as TIEs do not have hyperdrives, nor the fuel capabilities to travel to other systems. This will ramp up the pressure considerably - but has the potential to allow the PCs to get involved with a fun climax, attacking the space station! The time scales are a little tighter too, but again, this helps ratchet up the pressure - although they will have plenty of time to take apart the Repair Station before a Star Destroyer arrives.
Only GMs should continue reading!
Assault on Repair Station M13 Mission Briefing:
General Lens Reekeene, her husband Mikka and her alien advisor Santhou summon the team to debrief them ahead of their mission.
Lens Reekeene: Since we set up base here, I've been gathering intelligence and working towards a larger goal. Operation Retribution - which is due to take place soon - represents the fruition of those endeavours. The plan is to hit a variety of Imperial operations across the sector.
Once the operation is underway, the Empire will be overwhelmed by the simultaneous attacks. That’s why I’m assigning you to a mission on Mycroft. Santhou will explain the details…
 |
| Lens Reekeene |
Santhou: Thank you General. In orbit around Mycroft is a space station which will be targeted by Bronze squadron; but on the surface, there is a refuelling depot. Our intelligence suggests that the outpost is home to approximately fifty staff. However, we expect that most of these are civilians who are neither trained soldiers, nor likely to wish to become embroiled in any firefight.
Beneath the outpost, a small hangar bay is built into the side of the cliff where space craft can be refuelled. Intelligence indicates that it houses three TIE fighters which we expect to be scrambled to respond to our attack on the space station. If at all possible, we want you to disable those TIEs before they have the chance to launch, but it is not mission priority; our flyboys should be able to handle such puny opposition. Keep in mind though that if an alert is raised before our attack, not only could those TIEs be scrambled, but further fighters could be deployed from the space station to end your incursion. I do not need to stress how deadly strafing TIE fire may be should you be caught out in the open.
Once the Bronze squadron’s attack is underway, the Empire will be unable to send reinforcements to the planet for a further twelve hours…
 |
| Santhou |
Lens: Giving you plenty of opportunity to act. Your mission is to harass the outpost, capture prisoners for interrogation, steal supplies and weapons, and, if possible, destroy the entire outpost. Hit hard, maximise damage at minimum risk, and make sure you get out of there after two days. Try to bring everyone home alive! May the force be with you.
As well as the items set out in the Outfitting section of the outline, Captain Hark'r will provide the team with data terminals to download data if they are able to access the station’s Command Centre.
Now that the mission is about to get underway proper, you can use this video opening scroll to get the players into the Star Wars headspace!
Deadline on Mycroft:
As set out in the outlined adventure with the following additional detail:
It occurred to me that the workers on the Repair Station would live somewhere close by. Down in the valley below the mountaintop Repair Station is a small settlement called Restitution. There is a clearing wide enough to land several ships, so the Long Shot can touch down there.
The village sheriff, Laurent Rockoki, a grizzled old man will approach them and ask their business. Rockoki isn't particularly suspicious and will welcome the players to their village. He can provide them with the following information:
The settlement was built for the workers but is not well supplied. The food is bland and they need more generators; the power often goes down in the village. He will welcome anything the PCs can do to improve their conditions.
There is a small cantina where workers often congregate for well-earned refreshments.
The workers carry out 12 hour shifts. One shift is taken to the Repair Station on the "bus" which then picks up the workers finishing their shift and takes them back to the settlement. The drive up to the Repair Station up the winding roads of the valley takes an hour.
The PCs have various options now:
Scout: they can hike up the valley and scout the base from the surrounding forest
Disguise/Infiltration: disguise themselves as workers or, if they ambush some of the patrolling Stormtroopers, disguise themselves as them to gain entry to the base. Note that if they try the cantina, the locals will be suspicious of any PCs who openly speak out against the Empire (their employer) - and report them to patrolling Stormtroopers who will arrest them and then take them to the Repair Station for interrogation.
Climb: Another option would be to scale the cliff-face to gain access to the hangar. This would require three climbing rolls; Easy, Moderate, and Difficult as the rocks become more sheer and the climb becomes progressively harder as they close in on the hangar.
The Long Shot: They can simply use the Long Shot to attack the outpost, but this is likely to end in disaster.
The Repair Station:
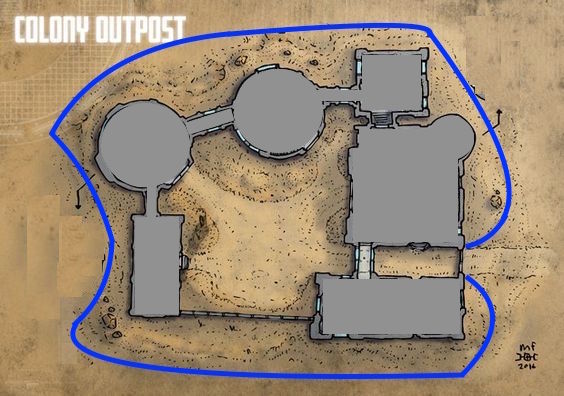
As outlined in their briefing, the Repair Station is built on a cliff edge. There are a number of buildings constructed above ground, but the hangar bay which has berthings for 12 TIEs, is built into the side of the cliff-side, 50 feet beneath the station.
This first map illustrates the area around the base. It can be used if TIEs are scrambled and the team involve the Long Shot in their battle.
Special thanks to Robert McCormack for creating this image. (Fans of this campaign will better know him as Jimi Ackbar and now Corr Alden.)
 |
| The Repair Station & Surrounding Landscape |
The second map and third maps illustrate the section of the Repair Station which is above ground. The first hides the detail of the interiors from the players.
 |
| Repair Station Exterior |
 |
| Repair Station Interiors |
The fourth map shows the hangar bay. Note that on Roll20 there are resources to populate this with TIE fighters and freighters to your own personal tastes. Be sure to leave the TIEs plenty of space to move out from their berthings!
 |
| Hangar Bay |
And the GM maps. The key for these follows.
 |
| Repair Station M13 GM map. |
Repair Station M13 Key (1-9):
1: Main Gate: 2 Stormtroopers are always on guard here. They have keycards which, if the PCs try a head on attack rather than sneaking in, can manually open the outpost’s doors.
2: Workers recreation area. Nothing particularly of interest here, unless the PCs want a game of holochess.
3: Tool shops: Full of equipment which can be used to repair any vessel landing in the courtyard between the buildings, but more commonly used for Repulsorlift Repair and for the bus.
4: Vehicle station: This is where the refuelling tanker is parked. There are stairs up to location 9 or down to the Hangar location 11. Between 4-5 is a corridor which has doors into and outside of the compound. One Stormtrooper is usually stood outside the doorway, looking to the woods. Again, he has a keycard to open doors in the base.
5: Command Centre: If the base has been alerted to the attack, the entrances to this area will be locked down. Several Imperial Officers and base workers can be found here. This is the central hub for communications, sensors, fuel regulation for the tanks in the hangar below, the electrified fence, remote links to the two turbo-lasers which protect the base (found on locations 9 and 19), and for security cameras around the base. There is also a stairwell leading down to a sub-level (not illustrated) into a large dormitory for the station’s support personnel.
6: Conference Rooms: Some of the base’s staff may be found here - but they will flee to the command centre if the alert has been issued.
7: Vehicle pool. The outpost’s 3 Repulsorlift Transports with Repeating Blasters can be found here.
8: Observation Spire: Overlooks the forest. Always manned by one Stormtrooper. There are stairs down to the Hangar on location 10.
9: Turbolaser Spire: The main defensive weapon for the upper level of the base- can attack incoming vessels. Again, one Stormtrooper is always here, manning the gun.
 |
| Hangar Bay GM Map |
Hangar Bay Key (10-19):
10: Stairway down from 8.
11: Stairway down from 4.
12: Supply crates: Full of food, medical supplies and blasters - just what the Rebels have been asked to find.
13: Fuel Pods: There are the three pods as seen plus another three far larger silos suspended above this chamber. If these are blown up, they will destroy the support staff dormitories and control dome above them. In addition, the fuel pumps in this room lead cut through rock into the hangar bay’s refuelling stations: those stations will essentially become massive flame throwers filling the hangar with liquid flame! The repair station will be, to all intents and purposes, destroyed if these tanks are blown apart.
14: Power Generator Room: Destroying this will shut down all power across the outpost. Doors will be permanently closed and only red emergency lighting will illuminate the dark corridors throughout the base. (-1D to Ranged Combat unless PCs have infrared scopes).
15: Cafeteria: Where all of the staff are fed. Plenty of food rations to be found here.
16: Stormtrooper Dorms: Beds and some personal effects can be found, but nothing much of interest. These are positioned close to a corridor which leads out on to a catwalk above the main hangar. From that catwalk, the pilots can climb down ladders into the TIE fighters (should they be there).
17 & 18: Stormtrooper recreation facilities. Again, nothing of note here. If the TIEs are still in the hangar, 12 TIE pilots will either be here or in the Dorms.
19: Main Hangar: Two Stormtroopers watch over the bay. There are two sets of TIE racks in this room, each holding 6 TIEs each (though only one is illustrated). Unless the PCs attack once all TIEs have been scrambled, these begin loaded. 6 TIEs are in the racks - and the other 6 are in a second rack held in a recess in the wall. The first rack has to be emptied before the second recessed rack moves forward into position. TIEs are accessed from the catwalk above: ladders lead off the catwalk, allowing TIE pilots to descend into the fighters beneath. TIEs enter and exit by the opening in the cliff edge to the south. A turbo laser battery is also positioned at the south east corner.
Security: When the base goes into lockdown (Stage 3), doors will require successful Security rolls to be opened. These will be Easy rolls, but Difficult rolls will be required to open doors to the Control Dome, Fuel Pods and Power Generator.
Computer Programming: When accessing the Control Dome, the PCs can attempt to access the computer system. It requires a Very Difficult roll to unlock the computer and access data for the Alliance. Of course, perhaps the base’s Commander may be persuaded into unlocking the information for the team!
 |
| Stealing the Data! |
Data: The control centre’s computer has details of extensive communications with several Imperial outposts across the Fakar Sector - specifically bases on Vakkar, Doneer’so, Sinkar, and a Communications Centre in Takari city on Iyuta. This last will be of considerable importance to Lens Reekeene who will want to bug the communications centre - a clear narrative hook into the Long Shot adventure called “The Plant”. Any of the Imperial Officers can also confirm this information.
The TIE problem: The intelligence that Reekeene’s Roughnecks had which suggested there were only 3 TIEs in the base was way off; there are 12! This means that the impending attack upon the space station in orbit is in very real danger. Note that there was no failure of intelligence, it's simply a case of the base having received a fresh squadron of TIEs for maintenance since the recon mission was carried out.
The Attack:
There are a few options the PCs have here; they could sabotage the TIEs, attempt to take control of turbolaser batteries and shoot some down as they blast off, use the Long Shot to battle them (unwise!), or even hijack a few of the TIEs! Imagine the confusion among the TIE ranks if the hijacked fighters in their own ranks suddenly begin firing upon them and even assist the X-Wing attack on the station!
The Final Battle:
 |
| Attack on the Space Station! |
The Space Platform stats on page 116 of the Hideouts and Strongholds book should be used for the Space Station. The main concern for the PCs will be the 4 Turbolasers and the Concussion Missiles battery (8D damage omitted from stats) as well as the 8 TIEs defending the base. 8 X-Wing fighters will be arriving for the attack and should destroy the defending TIEs on a roughly 2-1 basis (depending on how easy or difficult you want the attack to be for your PCs). If the PCs have joined the TIE squadrons, it will take both the base and the TIE fighters several turns to identify the enemy in their own ranks. X-Wings and any other non-imperial vessels will be prioritised targets in the defence of the space station, but once it becomes obvious which TIEs are wreaking the most havoc, those too will be targeted. In terms of the destroying the base, the 4D Hull on the station is equivalent to 10D against Fighters and has 2D of added shields, meaning that the Rebels will want to target specific points on the station to maximise damage.
If they open comms to the X-Wings, they can be told of the targets to hit - but a successful Technical Roll will also reveal the same information (Note that one piece of information can be revealed for each difficulty the roll achieved - i.e. a roll of 13 equates to a Moderate roll, revealing 3 pieces of information). The X-Wings are better placed to attack the platform as they have Proton Torpedoes. If the PCs open comms to them, they will explain this and request that they cover them during their attack runs.
- Shield Generators - Taking out any one of these will knock out the Shields on that side of the base. All must be disabled to leave the base open to attack from all sides.
- Command Bridge - If the Command Deck is destroyed, all defences are compromised as sensors go down (remove Fire Control bonus for Turbolasers). TIE fighters may be less effective in identifying threats as the squadrons are no longer being coordinated from the Bridge.
- Environmental Controls - these regulate the base’s air and gravity. Destroying them effectively wipes out the entire base (although it will take several hours for the air to run out)
- Fuel Tanks - if these heavily armoured tanks can be breached (12D Hull against fighters), they will cause an explosion which will tear through the entire station and cause it to explode!
 |
| Map for Space Station Attack |


No comments:
Post a Comment