Conspiracy! Solo Play Campaign Part 2
Introduction
This campaign is simply a series of scenarios I am playing through to playtest my Solo Play rules published on this blog. If you missed Part 1 you can find it here. I'm recording these games as battle reports for gamers and, in italics, a narrative story line to accompany the action. Enjoy Part 2!
 |
| Johnny and Wulf in action by Carlos Ezquerra Copyright Rebellion 2000AD Ltf |
Scenario Background
Bubo and the Bad Boys having been picked up by a law-enforcement shuttle, Brute leads Johnny and Wulf to a wide, desolate plain. In the centre of the plain is a tiny settlement consisting of nothing more of a few buildings, a power generator and a watchtower.
"Der robot Steelkreeg is out there?" Wulf asks, passing Johnny the binoculars.
"Steelkreeg plays by the odds," Johnny replies. "His hideout is in the middle of nowhere where he won't be disturbed. In the unlikely event anyone does comes along, he can see them coming from every direction. Remember he's hired the Weerds. Never nice going up against fellow S/D Agents."
"They've got Middenface in a coffin in one of those buildings," Brute says, pointing into the distance.
"And vy vould you know that," Wulf barks, "unless you vere working vith der scum like Steelkreeg?"
"We-we had a deal," Brute answers defensively. "So I'm free Alpha?"
"Sure, go."
"I don't know which way to the spaceport..."
"I said I'd set you free. You're free. Be thankful you're still alive. Get out of here."
"You can't do this Alpha," Brute complains.
"It's already done," Johnny replies, walking off towards the settlement.
"Best start valking old cucumber! And don't follow us! Der Happy Stick vill not be so merciful a second time!"
Brute does not argue further and starts walking in the opposite direction. Wulf follows Johnny, talking as they go.
"Ve vait till nightfall Johnny?"
"No, we can't wait. We're being tracked. We have to take 'em head on before more trouble catches up with us. Besides, they may be moving off with Middenface soon."
"Who is tracking us Johnny?"
"Some of Bubo's gang. If I had to guess, Darkus and his Howlers."
"Bubo, Darkus, Steelkreeg, der Weerds...vy ve take this job Johnny? Is der dangerous business!"
"In our line of work, when isn't it? They'll be waiting for us, let's not disappoint them!"
Forces
Player Band:
Johnny Alpha (hero mode): 19 Notoriety
Wulf Sternhammer: 15 Notoriety
Middenface McNulty: 13 Notoriety
Total: 47 Notoriety
Enemy Band:
Hiss Weerd: 10 Notoriety
Cuss Weerd: 7 Notoriety
Silent Weerd: 1 Notoriety
Steelkreeg: 15 Notoriety
Darkus: 13 Notoriety
2xHowlers: 12 Notoriety
Total: 58 Notoriety
Note: Johnny and Hiss are the leaders of their respective gangs.
Game Notes
Job: Round Up (Gunfight)
Encounter: Raiders
Collateral: Unused (Defender was entitled to 150,000, 110,000 effectively spent in Notoriety)
Special Rules:
1) Middenface cannot join the battle until he is freed from the coffin (inside the left hand house). The coffin can only be opened by a Player Band member who must spend a Single Action to open it, freeing Middenface.
2) Hiss, Cuss, Silent and Steelkreeg can start anywhere in their half of the board; Middenface's location is within that half.
3) The game doesn't end until one side is decisively defeated (in other words, when I decide).
4) There's no hidden set up: Johnny has had plenty of time to use his Weird Eyes ability to pinpoint where all enemies are hiding. The Enemy Band have been watching Johnny and Wulf's approach so they are deployed in a defensively advantageous position after Johnny and Wulf have been placed on the board.
5) Darkus and his Howlers will arrive on a random board edge not within 9" of Player Models on Turn 3.
6) Solo Play note: the Enemy Band are a combination of Gunslingers and All-Rounders. The Enemy Band's starting force will use the Defender Gunslinger and Defender All-Rounder flowcharts to determine their actions. Their reinforcements in the form of Darkus and his Howlers will use Protagonist Flow Charts.
The Encounter
1) Set up. As you'll see above I took some extreme liberties with the actual Job and Encounter. I tried also to up the difficulty after Part 1 went a little too smoothly, giving the opposition a larger band. The fact that Darkus and his two Howlers will be entering the field of play on Turn 3 forces Johnny and Wulf to free Middenface very quickly or they will find themselves hopelessly outnumbered.
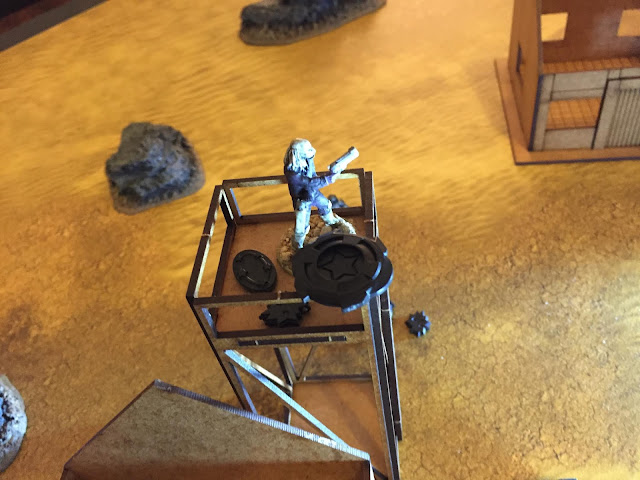
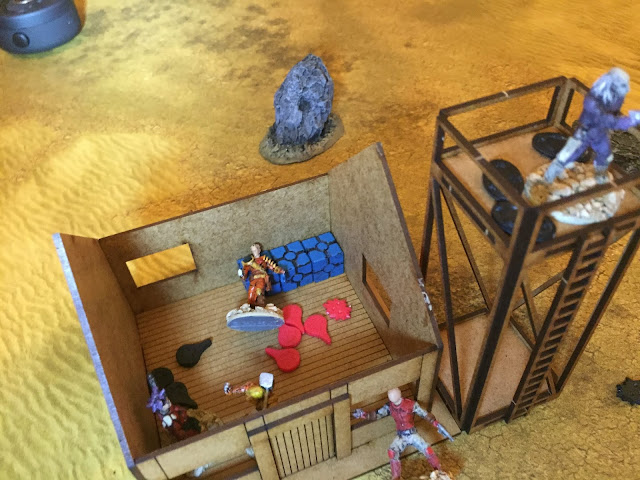
There are two buildings on the board; Middenface is hidden in the crates/coffin within the left hand building. Hiss Weerd is inside guarding the "Tartan Terror", looking out towards Johnny and Wulf's deployment point which is on the bottom right of the board. Silent Weerd takes cover behind a crate outside the left-hand building, while Cuss Weerd is atop the watchtower. Steelkreeg is positioned behind the right hand building. This is a bad error which I only realised once the game was underway; if you have heavy weapons models, you want them out in the open (but perhaps behind crates for protection) because it requires a double action to fire them. In other words if you move, you cannot fire.
1. Using the powerful Alpha-rays that his eye emit, Johnny sees Middenface moving inside the coffin; Brute's information had been accurate at least. Time was running out however, they could see Darkus and his Howlers closing in behind them. They had to free Middenface quickly if they were to survive this...

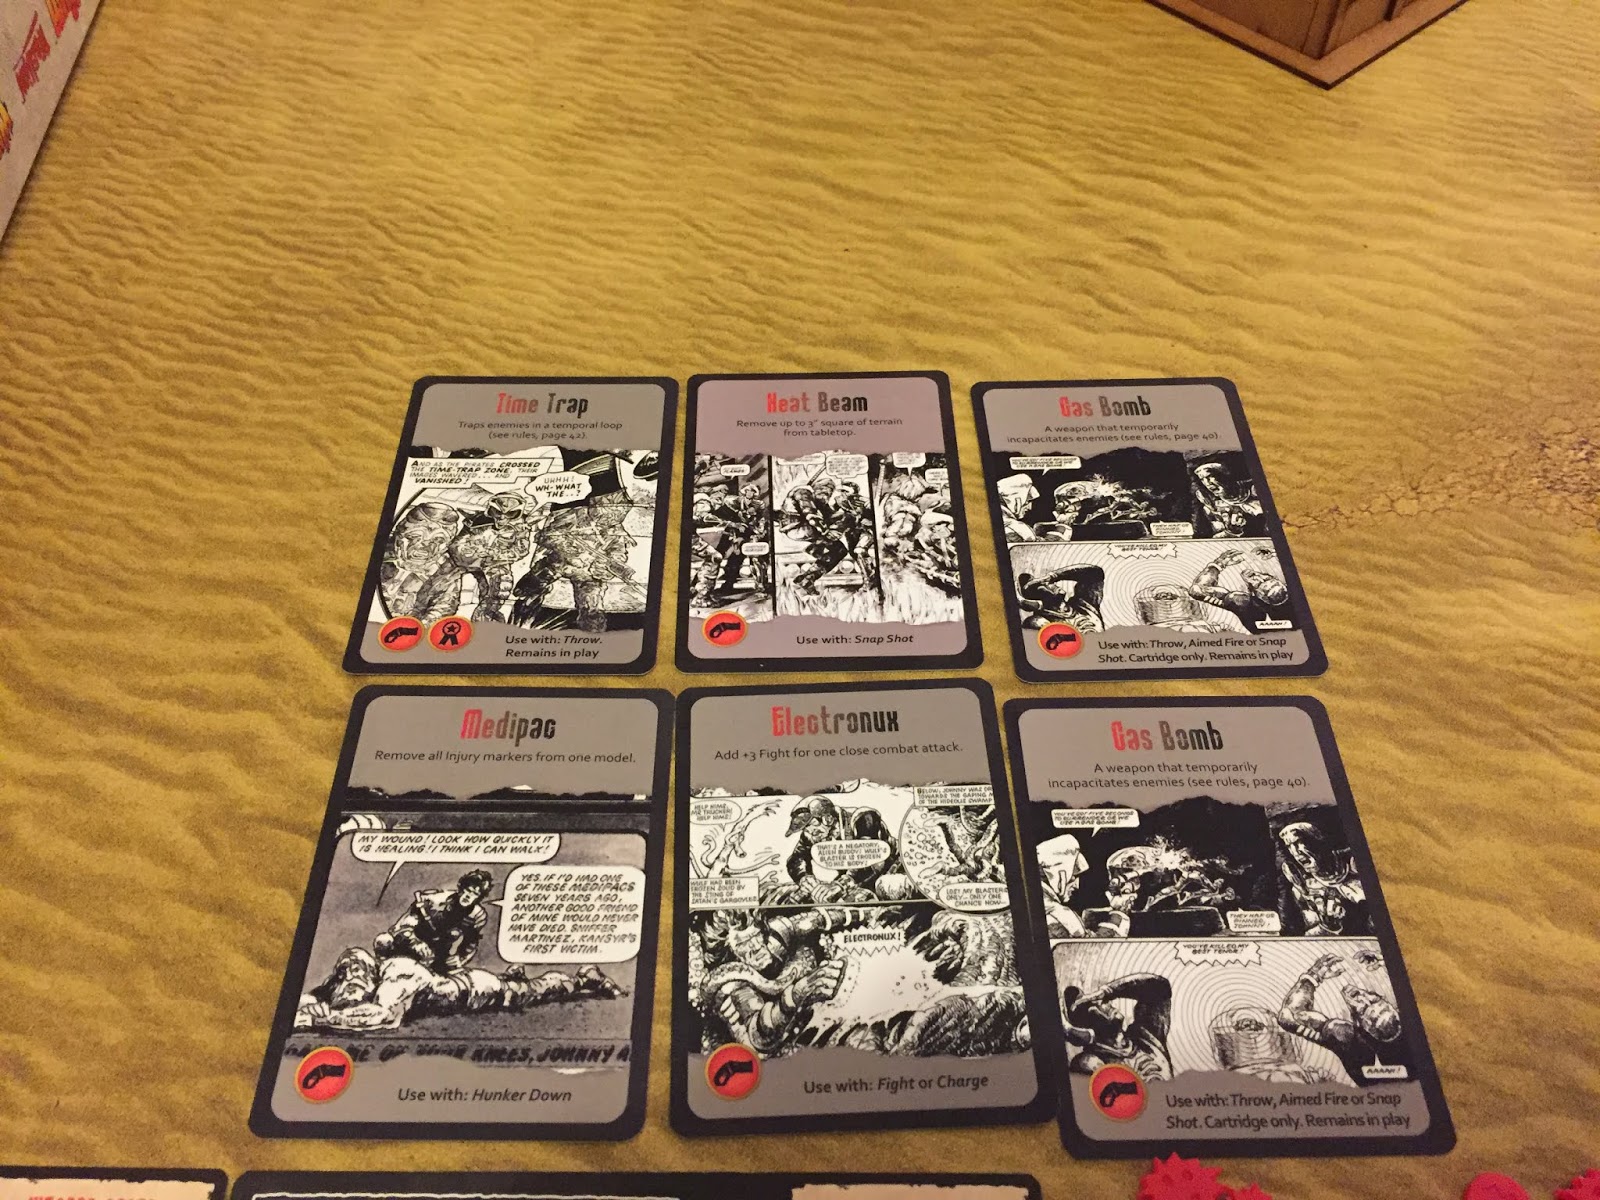
2) I deal out 6 Armoury Cards to myself. As I'm entitled to 4 Armoury Cards as Johnny is Well-Equipped, I opt to discard both of the Gas Bomb cards and keep the others.
2. "Heat Beam, check. Medpac, check. Time Trap, check. Electronux - check!"
2. "Heat Beam, check. Medpac, check. Time Trap, check. Electronux - check!"
3) With the notion of increasing the difficulty of the job still on my mind, I gamed it for the opposition and made Hiss Weerd the leader even though in the Scenario narrative Steelkreeg is really the leader as he has hired the Weerds as bodyguards. The effect of this is that the Player Team only get 2 Chicanery Cards...
3. "We're going to need to move fast Wulf," Johnny nods. "That creep Steelkreeg'll be analysing our every move! Keep on your toes!"
3. "We're going to need to move fast Wulf," Johnny nods. "That creep Steelkreeg'll be analysing our every move! Keep on your toes!"

4) ...while the Enemy Band receive 4 Chicanery Cards. Remember in Solo Play that these are used to nullify 2 or more wounds or to prevent characters being incapacitated. Due to the Weerd Brothers' mistreatment of Silent Weerd in the strip, I rule that they would not waste any advantage (i.e. spend any Chicanery Cards) saving Silent.
4. "The Weerds may be Strontium Dog agents," Johnny continues, "but just because we wear the same badges doesn't mean they won't hesitate. Hiss and Cuss will play every dirty trick in the book to save their necks!"
"Is der crying shame," Wulf nods, "that they help scum against their own! Maybe der Happy Stick can knock sense into them!"
"Is der crying shame," Wulf nods, "that they help scum against their own! Maybe der Happy Stick can knock sense into them!"

5) Turn 1. Cuss is first to activate, and is placed on Overwatch.
5. Up on the watchtower, Cuss Hiss watched Johnny and Wulf approach.
"I see you Alpha," he thinks, aiming his blaster. "Just come a little closer..."
5. Up on the watchtower, Cuss Hiss watched Johnny and Wulf approach.
"I see you Alpha," he thinks, aiming his blaster. "Just come a little closer..."

6) Johnny uses "In My Head" but fails...
6. "I see you too," a voice whispers in Cuss' mind.
6. "I see you too," a voice whispers in Cuss' mind.

7) But does succeed in Pinning Cuss.
7. Cuss spins around, half-expecting to see Alpha right behind him. There is no one there though. When he turns back around...
7. Cuss spins around, half-expecting to see Alpha right behind him. There is no one there though. When he turns back around...

8) Johnny returns Star Chip to bag, reactivates. He Sprints to cover. Returns Star Chip again.
8. ...Johnny has already ran for cover!
8. ...Johnny has already ran for cover!

9) Johnny uses Aimed Shot to ensure Silent is taken out of the equation first.
9. "Don't feel good about shooting a blind man," Johnny grimaces, training his Westinghouse upon the featureless face of Silent Weerd. Johnny squeezes off a shot which clips Silent sends him crashing through the glass window behind him!

10) But his Star Chip isn't returned to the bag, pinning him.
10. Despite it being a stun shot, Johnny hesitates momentarily as the glass may have grievously wounded Silent.

11) Hiss Weerd activates, uses Aimed Shot.
11. "Rot your bones Alpha," Hiss howls, "no one harms our brother except us! You'll pay for that!"

12) Wounding Johnny twice!
12. Hiss opens fire and clips Johnny in the leg! He collapses on to one knee, and half-registers the blood spray in the sand beside him. He knows it is a bad wound, but he is still in the fight!

13) But - luckily for Johnny - Hiss fails to return the Star Chip to the bag and is pinned!
13. "I'm gonna kill you slow Alpha! Gonna make you bleed," Hiss shouts, wallowing in his success in wounding the legendary Johnny Alpha.

14) Steelkreeg activates, Sprints...
14. "++Human hirelings emotionally compromised++" Steelkreeg VII chatters to himself. "++Intervention required. Advance.++"

15) ...behind cover but with a clear view to use his Forepaw.
15. "++Optimal position achieved++"

16) Wulf activates, opting to take a Single Action Move.
16. "Ach, ve never take down Steelkreeg behind cover," Wulf says.

17) And moves forward, until Steelkreeg is in range and in his sights.
17. "Got any ideas big fella?" Johnny winces, clutching his wounded leg.

18) Rather than take a direct shot at Steelkreeg who benefits from cover, Wulf uses Heat Beam!
18. "Ja Johnny, ve remove der cover!"

19) Leaving Steelkreeg exposed! Note: I'm not clear if this was a legal card to play! Normally only Johnny can fire special ammunition because of his Cartridge Blaster. However, the Heat Beam only uses a Single Action and has no "Cartridge Only" restriction printed on the card so it seems ok...
With everyone having activated, this seems to be the end of the turn, but...
19. The rock is reduced to molten slag but, shimmering in the heatwave beyond, Steelkreeg VII is untouched!
"++Cover disintegrated. Zero damage sustained. Preparing Firepak. ++"

20) I play the Sudden Momentum Chicanery Card and Johnny and Wulf can activate afresh!
20. "Keep going Johnny," Wulf shouts.

21) Johnny activates but is forced to use Shake It Off to clear his Pinned Marker (regrettable because I wanted him to Hunker Down). Instead he puts his blaster to stun and opens fire at Cuss.
21. "Blaster to stun," Johnny says, squeezing off another round.

22) Which is just as well, because Johnny rolls poorly but the guaranteed stun is useful! Still carrying two wounds, Johnny opts not to try to return the chip to the bag.
22. "It'll take more than that to put me down Alpha," Cuss goads from his vantage point.
23) Next, Wulf activates again...
23. "I deal vith Steelkreeg," Wulf grunts, rushing forward.

24) And is able - just - to get into throwing range!
24. "Time's up for you verdammt robot," Wulf hollers, hurling a Time Trap at Steelkreeg.

25) Wulf throws a Time Trap! Steelkreeg is caught in a time loop and removed from the battle! Wulf does not attempt to return his Star Chip to the bag and Turn 1 ends!
25. In a blinding flash of light the trap activates, trapping Steelkreeg in time, replaying the last few seconds in a continuous loop!
"++Cover disintegrated. Zero damage sustained. Preparing Firepak. ++...++Cover disintegrated. Zero damage sustained. Preparing Firepak. ++"

26) Turn 2. Johnny activates...
26. "Need a tourniquet on this wound," Johnny thinks.

27) ...and Hunkers Down, removing an injury marker. He succeeds in returning the Star Chip to the bag, and his chip comes straight back out! He fires a devastating Aimed Shot at Hiss Weerd, which despite a good Resist and Light Cover bonus (he is in Heavy Cover but Johnny has that variable blaster which can shoot through walls), deals out a devastating five injuries!
27. Swiftly tightening his gun strap to stem the bleeding, Johnny looses another shot at Middenface's captor, Hiss...

28) A Chicanery card nullifies that! Johnny tries to return the Star Chip to the bag but fails and is Pinned! Hiss is next to activate, returning fire but Johnny easily Evades! Hiss attempts to return his Star Chip to the bag but without success - he is Pinned too!
28. ...but misses! Hiss returns fire but Johnny dives out of harm's way!

29) Cuss fails his Cool test and so has to spend both actions on Shake It Off, once for the Pinned marker and another for the Stun. He tries but fails to return his Star Chip to the bag, meaning he is Pinned again! The bad guys aren't having much luck!
29. Cuss tries to fire at Wulf but his gun jams!
"Snecking gun," Cuss curses.

30) Finally, Wulf Sprints forward to close in on Hiss. He takes cover behind a crate so that Hiss does not have a clear shot when he next activates. As he doesn't try to return the Star Chip to the bag, Turn 2 comes to a close. On the face of it, Johnny and Wulf should easily deal with Hiss and Cuss to free Middenface but...
30. Spotting Cuss struggling with his blaster, Wulf seizes the moment to sprint towards the building where Middenface is being held!

31) Turn 3 ...Darkus and his Howlers arrive! I use an old Epic dice to randomly determine where they deploy, and it isn't ideal - they have a clear bead on Johnny and Wulf! Can the Strontium Dogs still prevail?
31. Darkus and his Howlers arrive!
"Take Alpha alive?" one Howler asks.
"Dead better. Less trouble," Darkus replies.

32) The first chip out is a red Star Chip! I seize the opportunity to move Wulf inside where he spends a second singe action to free Middenface! Wulf fails his Cool test when he goes for broke and he is Pinned!
32. Wulf storms into the building and, ignoring Hiss, punches the unlocking mechanism on the side of the coffin. Hydraulics hiss and the box opens up. Middenface McNulty springs out like a demented jack-in-the-box.
"Cheers big yin," Middenface nods as he rushes towards his captor. "Ah'll take it fae here!"

33) Darkus activates and fires an Aimed Shot at Johnny Alpha but - even carrying a wound - the mutie Evades and dives behind cover! Talk about a stroke of luck!
33. Meanwhile, Darkus aims trains his gun upon Johnny and opens fire. The bullet whistling mere inches past his head, Johnny leaps behind a power generator to take cover.

34) And Darkus fails when he goes for broke.
34. "Alpha," the alien leader shouts. "Just want talk. Come out."

35) One of his Howlers activates and goes on to Overwatch in case Johnny breaks cover.
35. "That's why you have one of your Howlers ready to blow my head clean off if I break cover," Johnny shouts. "No deal!"
"You die now, it save us time Alpha!"

36) I activate a very angry Middenface who charges at Hiss.
36. In the shack, Middenface charges at Hiss Weerd.
"Right Hiss - you're claimed!"

37) Middenface inflicts two wounds.
37. "How'd ye like a close look at mah lumps," Middenface yells as he jerks his head back to deliver a Glesgae Kiss...

38) But Hiss nullifies the hit with a Chicanery card and Middenface fails when he goes for broke!
38. ...but Hiss sidesteps and Middenface head-butts the wall, taking a chunk out of the wall!
"That's gonnae need some corrective plasterwork..." Middenface shouts furiously. "...and so's your coupon when ah'm done wi' ye!"

39) Johnny activates and targets Cuss on the watchtower.
39. "Gotta take Cuss down first, then worry about Darkus," Johnny thought, opening fire on his fellow mutant.

40) ...inflicting two stuns on Cuss! Johnny fails to return his Star Chip. Cuss shoots back...
40. And he hits! Reeling from the impact, Hiss squeezes the trigger to return fire!

41) But Johnny Evades!
41. Once again, Johnny evades the attack! He is too fast for them!

42) Another Howler activates and goes onto Overwatch. Turn 3 ends!
42. "Alpha moves out, kill him," Darkus hisses as the other Howler aims at the power generator, scanning for a glimpse of Johnny!

43) Turn 4 begins with the Strontium Dogs playing Wrong Footed Chicanery Card and (slightly disappointingly) one of the Enemy Band's Chips is removed from the bag - at least it's a Star Chip! Hiss is first to activate and attacks Middenface, inflicting a wound before returning the Star Chip to the bag.
43. Hiss counter attacks and attempts a head-butt! One of the snakes bites Middenface in the nose!
"Argh! Ye sleekit snake-heided scunner, ye!"

44) Cuss is next to activate and fires again at Johnny.
44. "Dodge this Alpha," a furious Cuss shouts, squeezing off another shot from his blaster.

45) But Johnny once again Evades!
45. "Happy to oblige Cuss," Johnny responds, nimbly sidestepping the blaster fire.

46) Wulf is next and charges Hiss, swinging der Happy Stick with force! A Chicanery Card nullifies the wounds though!
46. "Snakes?" Wulf spits as he sees Hiss' assault on Middenface. "You look more like a voorm to me!"
Wulf swings Der Happy Stick as he charges Hiss! Once...

47) The Star Chip is returned to the bag and Wulf attacks again - but another Chicanery Card comes to the rescue for Hiss!
47. ...Twice!

48) And again! The Enemy Band have exhausted their supply of Chicanery Cards though, and Wulf returns the Star Chip to the bag!
48. ...Three times Wulf misses!

49) And when he activates again, he does inflict wounds upon Hiss! Not enough to put him down though! After four straight activations, Wulf's luck in Going For Broke finally runs out and he is Pinned.
49. But the forth attack finally makes contact, connecting with Hiss' chest with the crunching of ribs!
"Ooft Big Yin! That wis mair wild than mah granny's auld dug," Middenface exclaims.

50) Darkus is finally able to activate and has Middenface in his sights! Fortunately for McNulty, the cover saves him from harm!
50. "Hey ugly," Darkus bellows to Middenface, firing his long barrel hand blaster. "Too much noise! Shut it!"

51) ...and Darkus fails when he Goes For Broke!
51. "Ye missed, ye great hairy galoot," Middenface replies, grinning out of the window.

52) But Darkus isn't alone in having a bead on Middenface! One of his Howlers opens fire...
52. "I won't," one of the Howlers says, firing upon Middenface.

53) ...and inflicts a wound upon the Tartan Terror!
53. "Jings," Middenface yelps as a bullet tears through his left arm. "Mah bevvy arm!

54) Johnny activates but is forced to use Shake It Off! to clear his Pinned Marker.
54. Johnny feels slightly unsteady on his feet. Blood loss was slowing him down!

55) He can only inflict another stun on Cuss - but he is on the brink!
55. He shoots and stuns Cuss once again - but he knows he should have taken Cuss out of the equation by now!

56) But Johnny is Pinned once again!
56. Crouching down, Johnny ejects an empty cartridge from his Westinghouse and slams in a fresh reload.

57) Middenface is wounded but determined to put Hiss down. He has to use Shake It Off! which crucially denies him from Charging (and gaining that +1 damage bonus).
57. Middenface grabs Hiss and head-butts him again...

58) He does inflict a wound however...
58. ...this time breaking Hiss' jaw!

59) One last Howler activates, Moves around the rock to gain Line of Sight to Middenface.
59. The last Howler stalks around the rocky outcrop to draw a bead on McNulty.

60) Which he does and takes a pot shot! The cover saves Middenface this time! End of Turn 4.
60. He fires but the shot does not penetrate the shack!

61) Darkus is first to activate in Turn 5 and takes an Aimed Shot at Middenface! Another wound inflicted!
61. Darkus has Middenface in his sights and fires yet again. This time he finds his mark and Middenface is wounded!
"Argh! Gi'e's a break," Middenface exclaims.

62) Another Howler activates and makes an Aimed Shot...
62. Another Howler fires at Middenface...

63) And takes Middenface down!
63. "Uhh, ye dirty deevils," Middenface cries out as he is hit in the stomach. He stares dumbly at the wound for a moment before staggering backwards and crumpling to the ground!
"Middenface! By der Gotts," Wulf cries.
64) Johnny promptly takes vengeance by finally bringing down Cuss! His Star Chip also goes back into the bag!
64. Wulf's distress shakes Johnny to his senses and he fires at Cuss once again. The shot connects with Cuss and he falls from the watchtower, landing on one knee with a sickening crack!

65) The last Howler activates and fires at Wulf, but he is too tough in cover to harm!
65. A stray shot ricochets past Wulf's head but he is so filled with rage that he doesn't even register it!

66) Reduced to Cool of 1, Hiss must try to Hunker Down. He makes a run for it!
66. His dislocated jaw flapping wildly, Hiss makes a run to escape Wulf.

67. But as he flees, Wulf takes the opportunity to take a free attack. This time there is no escape as Hiss is dispatched through the window!
67. "You vant to leave," Wulf growls. "Allow der Happy Stick assist!"
Hiss is battered by the Happy Stick and driven straight through the window! He tries to crawl away but he has no remaining strength, and lies still.

68) Cuss dealt with, Johnny Moves and makes a Snap Shot - but misses!
68. With the Howlers attention firmly focussed upon his friends, Johnny is able to move into position to return fire.

69) And fails his Cool test when he Goes For Broke!
69. Somewhat uncharacteristically his shot fails to find its target!

70) Wulf is next to act, hitting the last Howler with a precision shot!
70. Wulf draws his blaster to target one of the Howlers. With Middenface out of the fight and Johnny struggling to find his mark, he realises that they are in danger of being overwhelmed by Darkus and his goons.

71) Inflicting two wounds! Wulf doesn't attempt to return his Star Chip to the bag, there ending Turn 5.
71. "Verdampt creature," Wulf curses as he opens fire.
The Howler wails as Wulf's shot hits it in the shoulder, severely wounding the creature!

72) At the start of Turn 6, a Howler activates and looses an Aimed Shot at Johnny!
72. One of the Howlers takes a shot at Johnny!

73) Inflicting another injury!
73. And a second bullet tears through his leg!

74) It is a relief that Johnny activates next; he Hunkers Down and plays the Medpac Armoury Card!
74. "Time to use that medpac,'" Johnny grunts to himself, cracking open the kit.

75) All of his Injury Markers are removed and his Star Chip returned to the bag!
75. Johnny applies proper dressings to his wound and takes an adrenaline shot...

76) Wulf makes an Aimed Shot to finish off one of the Howlers.
76. Seeing his partner safely behind cover, Wulf resumes his gunfight with one of the Howlers. The Howler cries out and crumples to the ground!
"Another vun down Johnny!"

77) Johnny is activated again, and he Moves, repositioning himself behind some cargo crates. He then fires a Snap Shot at the Howler...
77. Johnny knows he could play it safe and simply use his Alpha Rays and Westinghouse to shoot Darkus and his remaining Howler without having to show his face. That isn't his style though! He breaks cover and moves into position behind some crates.

78) ...wounding the creature! The Star Chip is returned to the bag...
78. The adrenaline shot coursing through his veins, Johnny sprays off three shots in rapid succession! The first wounds the remaining Howler...

79) And comes back out again! Another two wounds take out the Howler! The Star Chip goes back into the bag again!
79. ...the second silences the Howler!

80) ...And Johnny activates again, this time targeting Darkus himself!
80. And the third blows Darkus' hand clean off!

81) ...inflicting three wounds on Darkus! Finally, Johnny fails to return the Star Chip to the bag!
81. Darkus screams in outrage and horror as he stares at the spurting stump where his hand once was!

82) Reduced to Cool of 1, Darkus is forced to Hunker Down...
82. He spins away, taking cover behind a boulder and wrapping a filthy rag around the gushing stump.

83) ...but luck is not with him, he fails to heal any wounds!
83. But it is too severe a wound to heal!

84) Bleeding profusely and with Johnny and Wulf's guns trained upon him, not to mention his band utterly defeated, the wounded Darkus is forced to surrender. The job is done.
84. He feels faint and finally accepts defeat!
"Surr-Surrrrrrender," he waves to Wulf before falling unconscious.
The battle is over - but at what price?


9. "Don't feel good about shooting a blind man," Johnny grimaces, training his Westinghouse upon the featureless face of Silent Weerd. Johnny squeezes off a shot which clips Silent sends him crashing through the glass window behind him!

10) But his Star Chip isn't returned to the bag, pinning him.
10. Despite it being a stun shot, Johnny hesitates momentarily as the glass may have grievously wounded Silent.

11. "Rot your bones Alpha," Hiss howls, "no one harms our brother except us! You'll pay for that!"

12) Wounding Johnny twice!
12. Hiss opens fire and clips Johnny in the leg! He collapses on to one knee, and half-registers the blood spray in the sand beside him. He knows it is a bad wound, but he is still in the fight!

13) But - luckily for Johnny - Hiss fails to return the Star Chip to the bag and is pinned!
13. "I'm gonna kill you slow Alpha! Gonna make you bleed," Hiss shouts, wallowing in his success in wounding the legendary Johnny Alpha.

14) Steelkreeg activates, Sprints...
14. "++Human hirelings emotionally compromised++" Steelkreeg VII chatters to himself. "++Intervention required. Advance.++"

15) ...behind cover but with a clear view to use his Forepaw.
15. "++Optimal position achieved++"

16) Wulf activates, opting to take a Single Action Move.
16. "Ach, ve never take down Steelkreeg behind cover," Wulf says.

17) And moves forward, until Steelkreeg is in range and in his sights.
17. "Got any ideas big fella?" Johnny winces, clutching his wounded leg.

18) Rather than take a direct shot at Steelkreeg who benefits from cover, Wulf uses Heat Beam!
18. "Ja Johnny, ve remove der cover!"

With everyone having activated, this seems to be the end of the turn, but...
19. The rock is reduced to molten slag but, shimmering in the heatwave beyond, Steelkreeg VII is untouched!
"++Cover disintegrated. Zero damage sustained. Preparing Firepak. ++"

20) I play the Sudden Momentum Chicanery Card and Johnny and Wulf can activate afresh!
20. "Keep going Johnny," Wulf shouts.

21) Johnny activates but is forced to use Shake It Off to clear his Pinned Marker (regrettable because I wanted him to Hunker Down). Instead he puts his blaster to stun and opens fire at Cuss.
21. "Blaster to stun," Johnny says, squeezing off another round.

22. "It'll take more than that to put me down Alpha," Cuss goads from his vantage point.

23) Next, Wulf activates again...
23. "I deal vith Steelkreeg," Wulf grunts, rushing forward.

24) And is able - just - to get into throwing range!
24. "Time's up for you verdammt robot," Wulf hollers, hurling a Time Trap at Steelkreeg.

25) Wulf throws a Time Trap! Steelkreeg is caught in a time loop and removed from the battle! Wulf does not attempt to return his Star Chip to the bag and Turn 1 ends!
25. In a blinding flash of light the trap activates, trapping Steelkreeg in time, replaying the last few seconds in a continuous loop!
"++Cover disintegrated. Zero damage sustained. Preparing Firepak. ++...++Cover disintegrated. Zero damage sustained. Preparing Firepak. ++"

26) Turn 2. Johnny activates...
26. "Need a tourniquet on this wound," Johnny thinks.

27) ...and Hunkers Down, removing an injury marker. He succeeds in returning the Star Chip to the bag, and his chip comes straight back out! He fires a devastating Aimed Shot at Hiss Weerd, which despite a good Resist and Light Cover bonus (he is in Heavy Cover but Johnny has that variable blaster which can shoot through walls), deals out a devastating five injuries!
27. Swiftly tightening his gun strap to stem the bleeding, Johnny looses another shot at Middenface's captor, Hiss...

28) A Chicanery card nullifies that! Johnny tries to return the Star Chip to the bag but fails and is Pinned! Hiss is next to activate, returning fire but Johnny easily Evades! Hiss attempts to return his Star Chip to the bag but without success - he is Pinned too!
28. ...but misses! Hiss returns fire but Johnny dives out of harm's way!

29) Cuss fails his Cool test and so has to spend both actions on Shake It Off, once for the Pinned marker and another for the Stun. He tries but fails to return his Star Chip to the bag, meaning he is Pinned again! The bad guys aren't having much luck!
29. Cuss tries to fire at Wulf but his gun jams!
"Snecking gun," Cuss curses.

30) Finally, Wulf Sprints forward to close in on Hiss. He takes cover behind a crate so that Hiss does not have a clear shot when he next activates. As he doesn't try to return the Star Chip to the bag, Turn 2 comes to a close. On the face of it, Johnny and Wulf should easily deal with Hiss and Cuss to free Middenface but...
30. Spotting Cuss struggling with his blaster, Wulf seizes the moment to sprint towards the building where Middenface is being held!

31) Turn 3 ...Darkus and his Howlers arrive! I use an old Epic dice to randomly determine where they deploy, and it isn't ideal - they have a clear bead on Johnny and Wulf! Can the Strontium Dogs still prevail?
31. Darkus and his Howlers arrive!
"Take Alpha alive?" one Howler asks.
"Dead better. Less trouble," Darkus replies.

32) The first chip out is a red Star Chip! I seize the opportunity to move Wulf inside where he spends a second singe action to free Middenface! Wulf fails his Cool test when he goes for broke and he is Pinned!
32. Wulf storms into the building and, ignoring Hiss, punches the unlocking mechanism on the side of the coffin. Hydraulics hiss and the box opens up. Middenface McNulty springs out like a demented jack-in-the-box.
"Cheers big yin," Middenface nods as he rushes towards his captor. "Ah'll take it fae here!"

33) Darkus activates and fires an Aimed Shot at Johnny Alpha but - even carrying a wound - the mutie Evades and dives behind cover! Talk about a stroke of luck!
33. Meanwhile, Darkus aims trains his gun upon Johnny and opens fire. The bullet whistling mere inches past his head, Johnny leaps behind a power generator to take cover.

34) And Darkus fails when he goes for broke.
34. "Alpha," the alien leader shouts. "Just want talk. Come out."

35) One of his Howlers activates and goes on to Overwatch in case Johnny breaks cover.
35. "That's why you have one of your Howlers ready to blow my head clean off if I break cover," Johnny shouts. "No deal!"
"You die now, it save us time Alpha!"

36) I activate a very angry Middenface who charges at Hiss.
36. In the shack, Middenface charges at Hiss Weerd.
"Right Hiss - you're claimed!"

37) Middenface inflicts two wounds.
37. "How'd ye like a close look at mah lumps," Middenface yells as he jerks his head back to deliver a Glesgae Kiss...

38) But Hiss nullifies the hit with a Chicanery card and Middenface fails when he goes for broke!
38. ...but Hiss sidesteps and Middenface head-butts the wall, taking a chunk out of the wall!
"That's gonnae need some corrective plasterwork..." Middenface shouts furiously. "...and so's your coupon when ah'm done wi' ye!"

39) Johnny activates and targets Cuss on the watchtower.
39. "Gotta take Cuss down first, then worry about Darkus," Johnny thought, opening fire on his fellow mutant.

40) ...inflicting two stuns on Cuss! Johnny fails to return his Star Chip. Cuss shoots back...
40. And he hits! Reeling from the impact, Hiss squeezes the trigger to return fire!

41) But Johnny Evades!
41. Once again, Johnny evades the attack! He is too fast for them!

42) Another Howler activates and goes onto Overwatch. Turn 3 ends!
42. "Alpha moves out, kill him," Darkus hisses as the other Howler aims at the power generator, scanning for a glimpse of Johnny!

43) Turn 4 begins with the Strontium Dogs playing Wrong Footed Chicanery Card and (slightly disappointingly) one of the Enemy Band's Chips is removed from the bag - at least it's a Star Chip! Hiss is first to activate and attacks Middenface, inflicting a wound before returning the Star Chip to the bag.
43. Hiss counter attacks and attempts a head-butt! One of the snakes bites Middenface in the nose!
"Argh! Ye sleekit snake-heided scunner, ye!"

44. "Dodge this Alpha," a furious Cuss shouts, squeezing off another shot from his blaster.

45) But Johnny once again Evades!
45. "Happy to oblige Cuss," Johnny responds, nimbly sidestepping the blaster fire.

46) Wulf is next and charges Hiss, swinging der Happy Stick with force! A Chicanery Card nullifies the wounds though!
46. "Snakes?" Wulf spits as he sees Hiss' assault on Middenface. "You look more like a voorm to me!"
Wulf swings Der Happy Stick as he charges Hiss! Once...

47) The Star Chip is returned to the bag and Wulf attacks again - but another Chicanery Card comes to the rescue for Hiss!
47. ...Twice!

48) And again! The Enemy Band have exhausted their supply of Chicanery Cards though, and Wulf returns the Star Chip to the bag!
48. ...Three times Wulf misses!

49) And when he activates again, he does inflict wounds upon Hiss! Not enough to put him down though! After four straight activations, Wulf's luck in Going For Broke finally runs out and he is Pinned.
49. But the forth attack finally makes contact, connecting with Hiss' chest with the crunching of ribs!
"Ooft Big Yin! That wis mair wild than mah granny's auld dug," Middenface exclaims.

50) Darkus is finally able to activate and has Middenface in his sights! Fortunately for McNulty, the cover saves him from harm!
50. "Hey ugly," Darkus bellows to Middenface, firing his long barrel hand blaster. "Too much noise! Shut it!"

51) ...and Darkus fails when he Goes For Broke!
51. "Ye missed, ye great hairy galoot," Middenface replies, grinning out of the window.

52) But Darkus isn't alone in having a bead on Middenface! One of his Howlers opens fire...
52. "I won't," one of the Howlers says, firing upon Middenface.

53) ...and inflicts a wound upon the Tartan Terror!
53. "Jings," Middenface yelps as a bullet tears through his left arm. "Mah bevvy arm!

54) Johnny activates but is forced to use Shake It Off! to clear his Pinned Marker.
54. Johnny feels slightly unsteady on his feet. Blood loss was slowing him down!

55) He can only inflict another stun on Cuss - but he is on the brink!
55. He shoots and stuns Cuss once again - but he knows he should have taken Cuss out of the equation by now!

56) But Johnny is Pinned once again!
56. Crouching down, Johnny ejects an empty cartridge from his Westinghouse and slams in a fresh reload.

57) Middenface is wounded but determined to put Hiss down. He has to use Shake It Off! which crucially denies him from Charging (and gaining that +1 damage bonus).
57. Middenface grabs Hiss and head-butts him again...

58) He does inflict a wound however...
58. ...this time breaking Hiss' jaw!

59) One last Howler activates, Moves around the rock to gain Line of Sight to Middenface.
59. The last Howler stalks around the rocky outcrop to draw a bead on McNulty.

60) Which he does and takes a pot shot! The cover saves Middenface this time! End of Turn 4.
60. He fires but the shot does not penetrate the shack!

61) Darkus is first to activate in Turn 5 and takes an Aimed Shot at Middenface! Another wound inflicted!
61. Darkus has Middenface in his sights and fires yet again. This time he finds his mark and Middenface is wounded!
"Argh! Gi'e's a break," Middenface exclaims.

62) Another Howler activates and makes an Aimed Shot...
62. Another Howler fires at Middenface...

63) And takes Middenface down!
63. "Uhh, ye dirty deevils," Middenface cries out as he is hit in the stomach. He stares dumbly at the wound for a moment before staggering backwards and crumpling to the ground!
"Middenface! By der Gotts," Wulf cries.

64) Johnny promptly takes vengeance by finally bringing down Cuss! His Star Chip also goes back into the bag!
64. Wulf's distress shakes Johnny to his senses and he fires at Cuss once again. The shot connects with Cuss and he falls from the watchtower, landing on one knee with a sickening crack!

65. A stray shot ricochets past Wulf's head but he is so filled with rage that he doesn't even register it!

66) Reduced to Cool of 1, Hiss must try to Hunker Down. He makes a run for it!
66. His dislocated jaw flapping wildly, Hiss makes a run to escape Wulf.

67. But as he flees, Wulf takes the opportunity to take a free attack. This time there is no escape as Hiss is dispatched through the window!
67. "You vant to leave," Wulf growls. "Allow der Happy Stick assist!"
Hiss is battered by the Happy Stick and driven straight through the window! He tries to crawl away but he has no remaining strength, and lies still.

68) Cuss dealt with, Johnny Moves and makes a Snap Shot - but misses!
68. With the Howlers attention firmly focussed upon his friends, Johnny is able to move into position to return fire.

69) And fails his Cool test when he Goes For Broke!
69. Somewhat uncharacteristically his shot fails to find its target!

70) Wulf is next to act, hitting the last Howler with a precision shot!
70. Wulf draws his blaster to target one of the Howlers. With Middenface out of the fight and Johnny struggling to find his mark, he realises that they are in danger of being overwhelmed by Darkus and his goons.

71) Inflicting two wounds! Wulf doesn't attempt to return his Star Chip to the bag, there ending Turn 5.
71. "Verdampt creature," Wulf curses as he opens fire.
The Howler wails as Wulf's shot hits it in the shoulder, severely wounding the creature!

72) At the start of Turn 6, a Howler activates and looses an Aimed Shot at Johnny!
72. One of the Howlers takes a shot at Johnny!

73) Inflicting another injury!
73. And a second bullet tears through his leg!

74) It is a relief that Johnny activates next; he Hunkers Down and plays the Medpac Armoury Card!
74. "Time to use that medpac,'" Johnny grunts to himself, cracking open the kit.

75) All of his Injury Markers are removed and his Star Chip returned to the bag!
75. Johnny applies proper dressings to his wound and takes an adrenaline shot...

76) Wulf makes an Aimed Shot to finish off one of the Howlers.
76. Seeing his partner safely behind cover, Wulf resumes his gunfight with one of the Howlers. The Howler cries out and crumples to the ground!
"Another vun down Johnny!"

77) Johnny is activated again, and he Moves, repositioning himself behind some cargo crates. He then fires a Snap Shot at the Howler...
77. Johnny knows he could play it safe and simply use his Alpha Rays and Westinghouse to shoot Darkus and his remaining Howler without having to show his face. That isn't his style though! He breaks cover and moves into position behind some crates.

78) ...wounding the creature! The Star Chip is returned to the bag...
78. The adrenaline shot coursing through his veins, Johnny sprays off three shots in rapid succession! The first wounds the remaining Howler...

79) And comes back out again! Another two wounds take out the Howler! The Star Chip goes back into the bag again!
79. ...the second silences the Howler!

80) ...And Johnny activates again, this time targeting Darkus himself!
80. And the third blows Darkus' hand clean off!

81) ...inflicting three wounds on Darkus! Finally, Johnny fails to return the Star Chip to the bag!
81. Darkus screams in outrage and horror as he stares at the spurting stump where his hand once was!

82) Reduced to Cool of 1, Darkus is forced to Hunker Down...
82. He spins away, taking cover behind a boulder and wrapping a filthy rag around the gushing stump.

83) ...but luck is not with him, he fails to heal any wounds!
83. But it is too severe a wound to heal!

84) Bleeding profusely and with Johnny and Wulf's guns trained upon him, not to mention his band utterly defeated, the wounded Darkus is forced to surrender. The job is done.
84. He feels faint and finally accepts defeat!
"Surr-Surrrrrrender," he waves to Wulf before falling unconscious.
The battle is over - but at what price?

Aftermath
"Wulf," Johnny cries, "Middenface? Is he-"
"Deid?" Middenface grimaces, exiting the house with Wulf. "Nae chance! It tak's mair than these bampots tae plant a McNulty! Ah jist need a medpac."
"Ja, old cucumber," Wulf obliges, "nice of der Veerds to keep der supply for us."
"Nice nuthin'," Middenface grimaces, "the Weerds wur helpin' Steelkreeg abduct me!"
"The question is, why?" Johnny raised an eyebrow.
"There's a private contract oot oan me. Must be some norm wi' a grudge fae the war...or maybe Tiny Digits McTavish efter he heard ah'd pumped his missus... Whoever it wis, Steelkreeg wis a'ways a canny yin. He hired the Weerds tae let me know where he wis, walked me right intae his trap. They wur waiting fir a shuttle tae arrive tae tak' me away. Someone must ha'e been payin' a guid few boabies fir it tae be worth his while tae hire the Weerds. Whit were Darkus and his Howlers daein' here?"
"Part of Bubo's gang," Johnny responds. "Who are working for Max Bubba. As was Steelkreeg."
"Why wid Max Bubba want me? Ah wisnae oan the Ragnarok joab wi' the both of you."
"He knows you're a friend of mine, Middenface. Maybe you were to be bait to get to us. It would explain why the Weerds helped out, they've had it in for us too since we left 'em in hell."
"Hell? Whit are ye oan about Johnny?"
"Long story Middenface," Johnny smiles.
"Why no' ask 'em Johnny?" Middenface says, gesturing to the bloodied brothers.
"No time," Johnny scowls. "We'd better get outta here before the shuttle arrives. We're in no fit state for another battle."
"The Weerds stashed a few skimmers nearby," Middenface explained. "We kin use 'em tae get oot o' here."
"Lead the way," Johnny waves. "One other thing. I'm not letting you out of my sight until we get to the bottom of this. Consider yourself part of the team!"
"Velcome aboard," Wulf smiles.
"Cheers big yin! Lang may oor breeks reek lads!"
NEXT PROG: A Cure For Kansyr
 |
| Middenface Mcnulty by Carlos Ezquerra Copyright Rebellion 2000AD Ltd |
"Deid?" Middenface grimaces, exiting the house with Wulf. "Nae chance! It tak's mair than these bampots tae plant a McNulty! Ah jist need a medpac."
"Ja, old cucumber," Wulf obliges, "nice of der Veerds to keep der supply for us."
"Nice nuthin'," Middenface grimaces, "the Weerds wur helpin' Steelkreeg abduct me!"
"The question is, why?" Johnny raised an eyebrow.
"There's a private contract oot oan me. Must be some norm wi' a grudge fae the war...or maybe Tiny Digits McTavish efter he heard ah'd pumped his missus... Whoever it wis, Steelkreeg wis a'ways a canny yin. He hired the Weerds tae let me know where he wis, walked me right intae his trap. They wur waiting fir a shuttle tae arrive tae tak' me away. Someone must ha'e been payin' a guid few boabies fir it tae be worth his while tae hire the Weerds. Whit were Darkus and his Howlers daein' here?"
"Part of Bubo's gang," Johnny responds. "Who are working for Max Bubba. As was Steelkreeg."
"Why wid Max Bubba want me? Ah wisnae oan the Ragnarok joab wi' the both of you."
"He knows you're a friend of mine, Middenface. Maybe you were to be bait to get to us. It would explain why the Weerds helped out, they've had it in for us too since we left 'em in hell."
"Hell? Whit are ye oan about Johnny?"
"Long story Middenface," Johnny smiles.
"Why no' ask 'em Johnny?" Middenface says, gesturing to the bloodied brothers.
"No time," Johnny scowls. "We'd better get outta here before the shuttle arrives. We're in no fit state for another battle."
"The Weerds stashed a few skimmers nearby," Middenface explained. "We kin use 'em tae get oot o' here."
"Lead the way," Johnny waves. "One other thing. I'm not letting you out of my sight until we get to the bottom of this. Consider yourself part of the team!"
"Velcome aboard," Wulf smiles.
"Cheers big yin! Lang may oor breeks reek lads!"
NEXT PROG: A Cure For Kansyr


Closing Reflections
I was extremely pleased with how the Solo Play rules worked and that the scenario was extremely challenging. Frankly, had I not had a lot of luck returning Star Chips to the bag, I think I would have been defeated. Out of all of my Armoury and Chicanery cards I only had one left so I had called upon as many advantages as possible. This bodes well for the system if games are as difficult as this; overcoming a tough encounter is far more rewarding than one you breeze through! I'm looking forward to playing the next game!


No comments:
Post a Comment